

This article is for the IT, identity, and security team that owns your identity provider, and for the workspace admin working with them. It answers how to connect your identity provider to EveryoneSocial, verify your domain, test a sign-in, and require single sign-on, with the steps on the EveryoneSocial side and the steps on the identity-provider side kept separate.
Single sign-on in EveryoneSocial is self-serve. Everything happens from one page in your workspace, Admin Settings, Access, and from a hosted setup portal run by our identity partner, WorkOS. Nothing is exchanged by email: no metadata files, no certificates, no ticket with EveryoneSocial in the loop. Most teams finish in one sitting of about 30 minutes.
Note
Screens of the WorkOS setup portal and of Microsoft Entra ID in this guide come from WorkOS's public documentation and show example values. Labels can differ slightly from what you see, and the values you copy are always the ones on your own screen, never the ones in a picture.
01
Who does what, and where?
| Where | Who | What happens there |
|---|---|---|
| EveryoneSocial, Admin Settings, Access | A workspace admin | Opens the setup portal, verifies your domain, tests a sign-in, turns on Require SSO for workspace members. |
| WorkOS setup portal (setup.workos.com) | Your identity-provider admin | Picks your provider, reads the values to enter on your side, pastes your metadata URL back, tests the connection. |
| Your identity provider (Microsoft Entra ID, Okta, Google Workspace, Ping, OneLogin, JumpCloud, or any SAML or OIDC provider) | Your identity-provider admin | Creates the EveryoneSocial application, sets the claims, assigns users or a group. |
| Your DNS | Whoever manages the zone for your email domain | Publishes one TXT record to prove domain ownership. |
The Access page is admin-only. If the person who owns your identity provider is not a workspace admin, have your program admin invite them as one first, or run the steps together in one screen-share.
02
What do I need before I start?
- A workspace admin account. Admin invitations arrive from notifications@beta.everyonesocial.app and are accepted with a one-time sign-in link sent to your work email. No password is created at any point.
- Admin rights in your identity provider. For Microsoft Entra ID that is Cloud Application Administrator or Application Administrator, plus the right to assign users. Group-based assignment needs Entra ID P1 or P2; on Entra ID Free you assign people individually.
- A decision on who gets the application. We recommend assigning everyone who will use the program, because anyone assigned can sign in without a separate invitation once accounts are created automatically (see below).
- Optional: access to DNS for your email domain, to publish one TXT record.
- SSO enabled for your workspace by EveryoneSocial. Until it is, the Single sign-on card reads Not enabled for this workspace yet. Ask your EveryoneSocial contact before the identity-provider admin sits down.
03Step 1EveryoneSocial
Where do I start?
Sign in to your workspace, open Admin Settings (the gear icon), and choose Access under Workspace. The page is a stack of cards: Workspace domains, Allowed guest domains, Single sign-on, Sign-in policy, and the Guests roster.
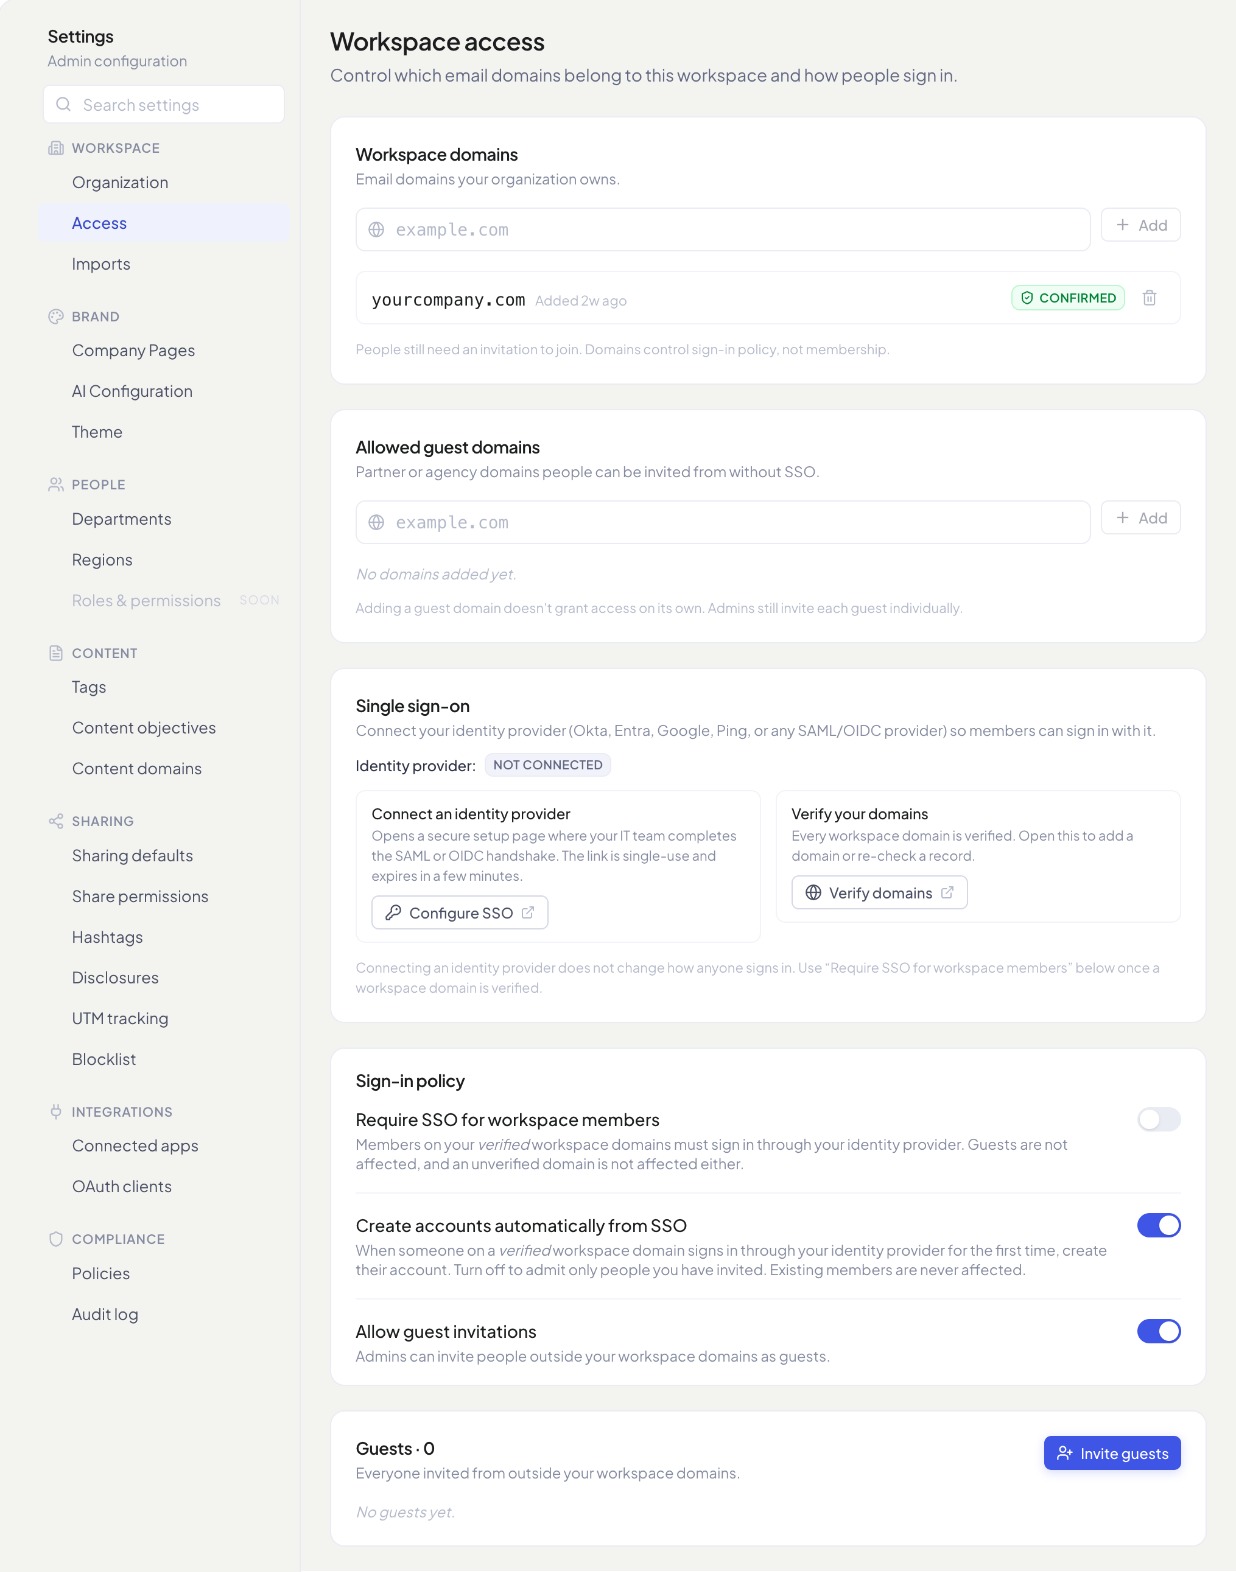
Two things to check on this page before you open the portal:
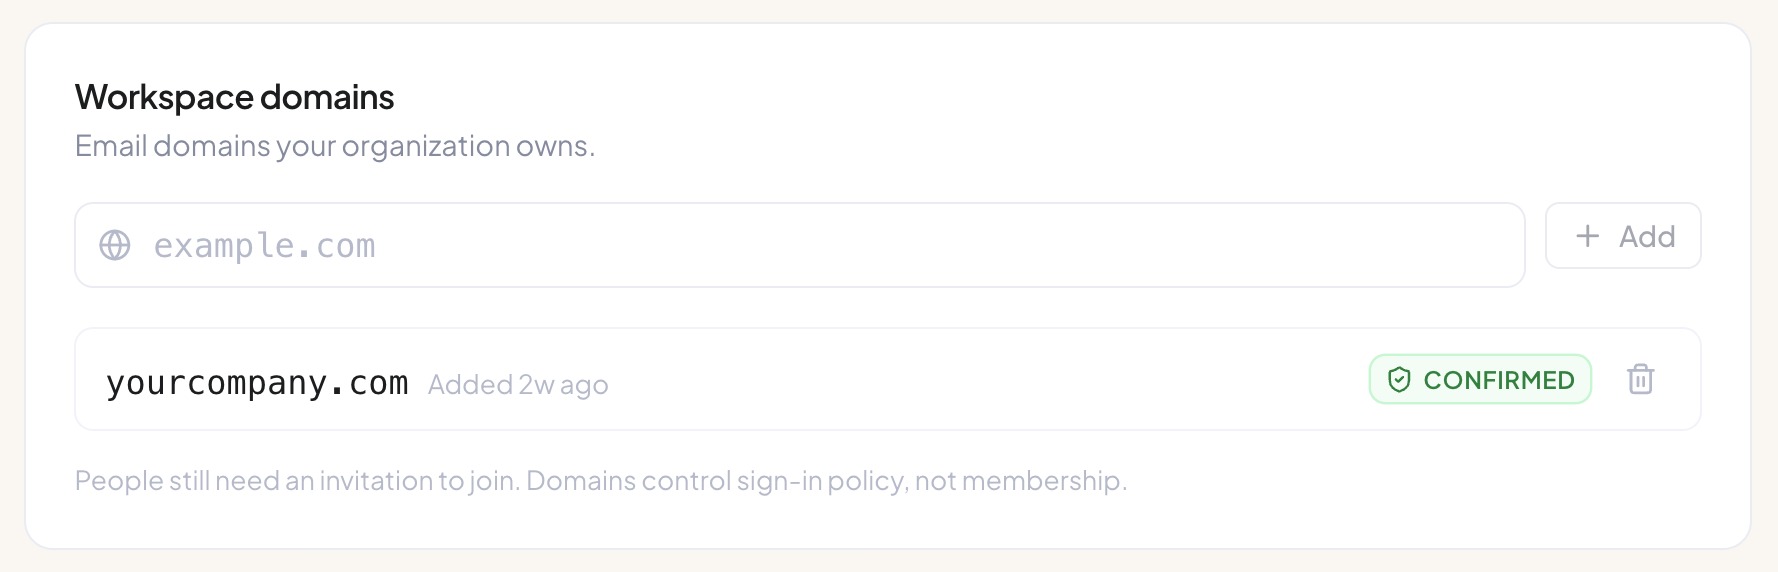
- Workspace domains lists the email domains your organization owns. Your domain should already be there, added when the workspace was created. Add it if it is missing. Consumer domains such as gmail.com are refused.
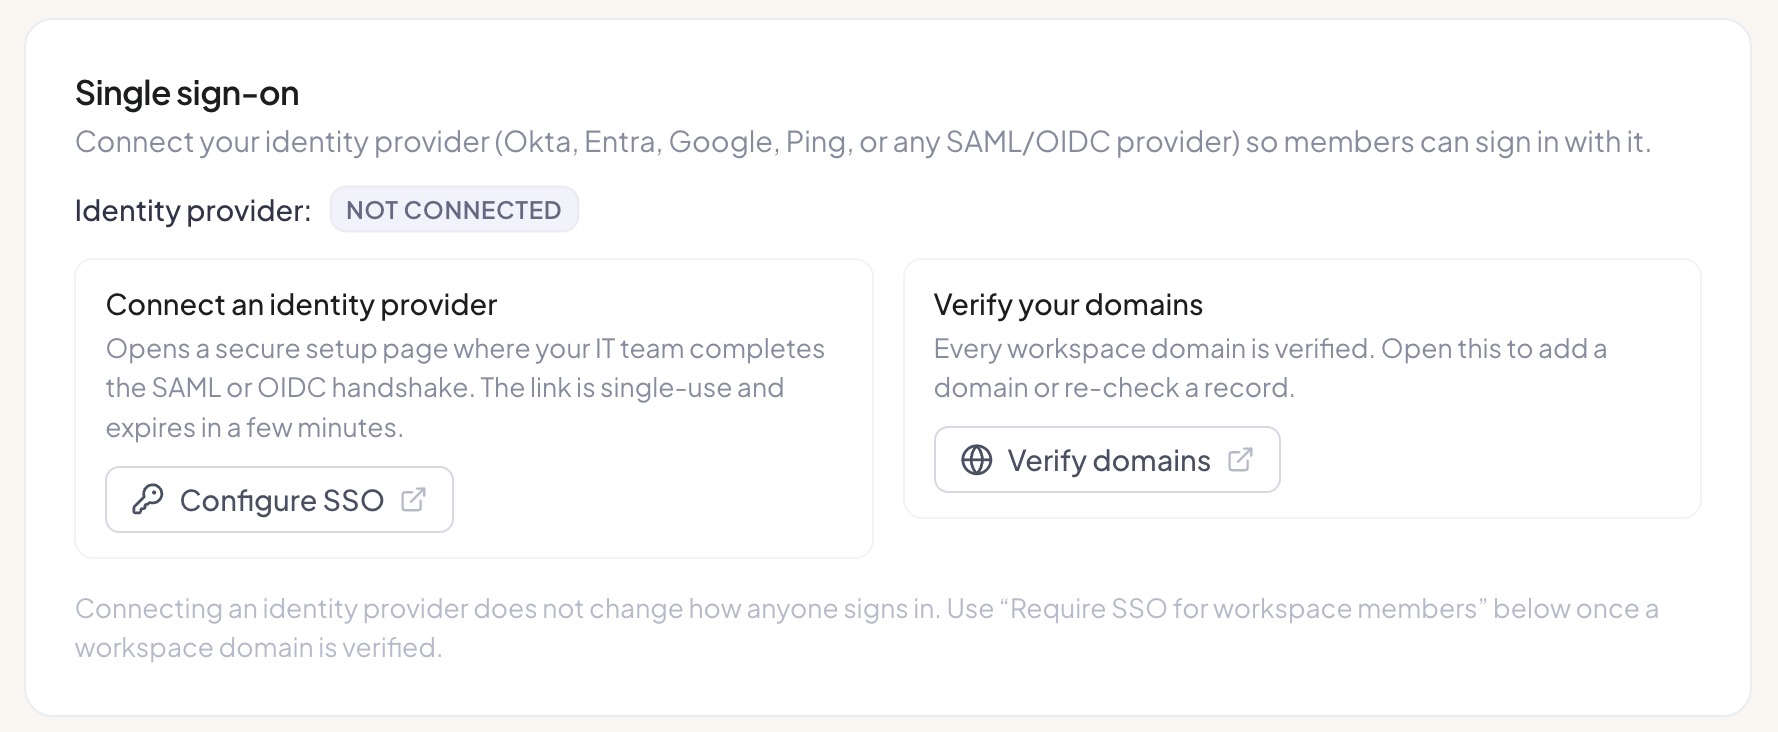
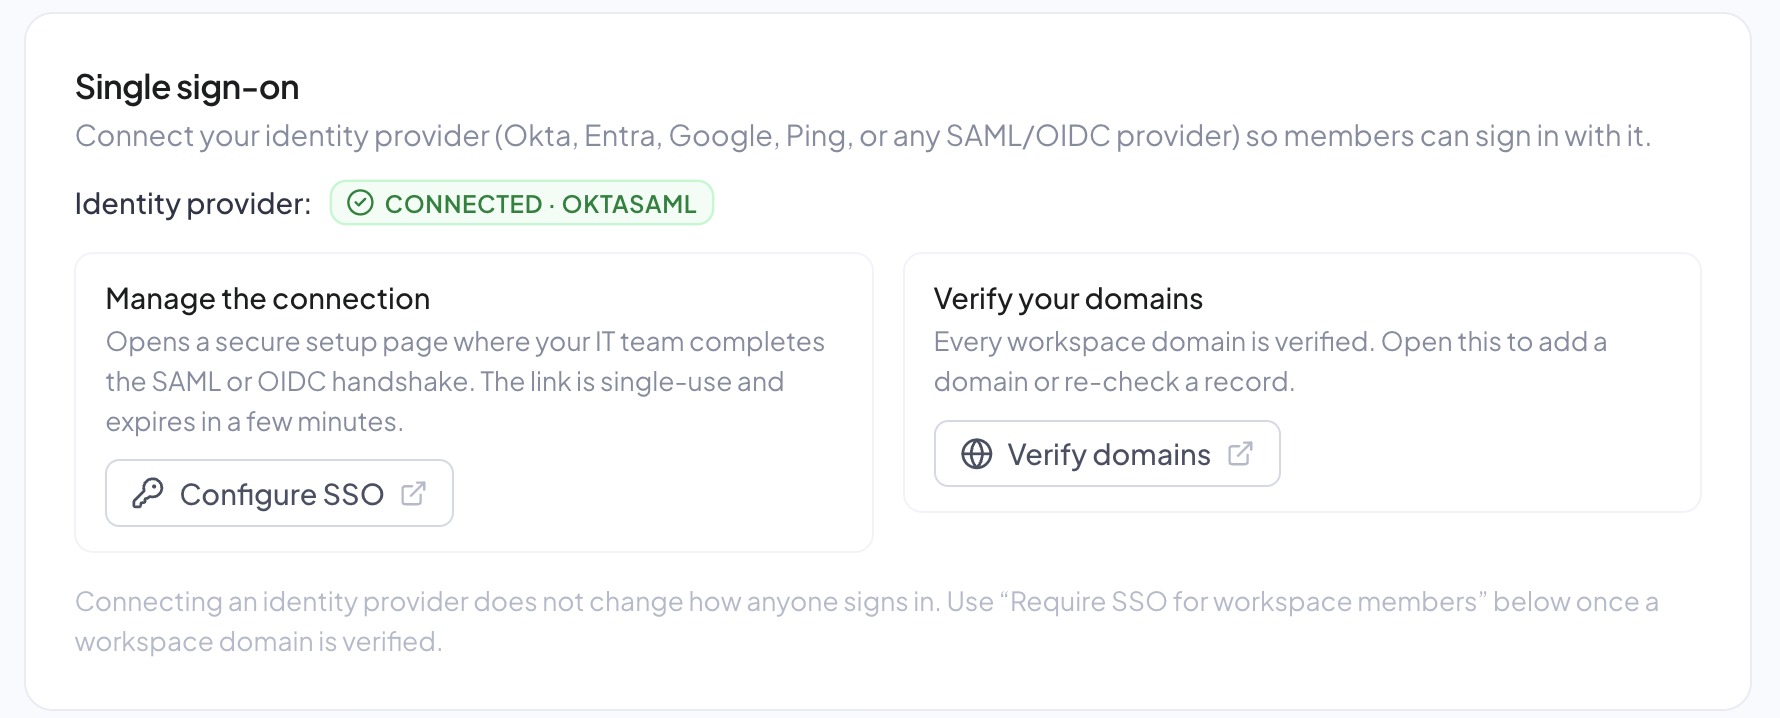
- Single sign-on shows the current state beside Identity provider: Not connected, Setup in progress with the connection type, or Connected with the connection type. Below it are the two buttons you will use, Configure SSO under Connect an identity provider, and Verify domains.
04Step 2EveryoneSocial
How do I open the setup portal?
Click Configure SSO. The button creates a fresh setup link and opens it in the same tab. When the portal is done it returns you to this Access page.
Important
The setup link is single use and expires five minutes after it is created. Click Configure SSO when the person doing the identity-provider work is at the keyboard. Do not paste the link into an email to use later; if it expires, come back to Access and click the button again.
Opening the portal does not change how anyone signs in. The card says so directly: connecting an identity provider does nothing until Require SSO for workspace members is turned on in Step 8.
05Step 3WorkOS portal
How do I choose my identity provider?
The portal opens on Select your identity provider. Search with Find your provider or scroll the list. Microsoft appears as the Entra ID (Azure AD) option (older screens label it Azure AD SAML). If your provider is not listed, use Custom SAML or Custom OpenID Connect at the bottom.
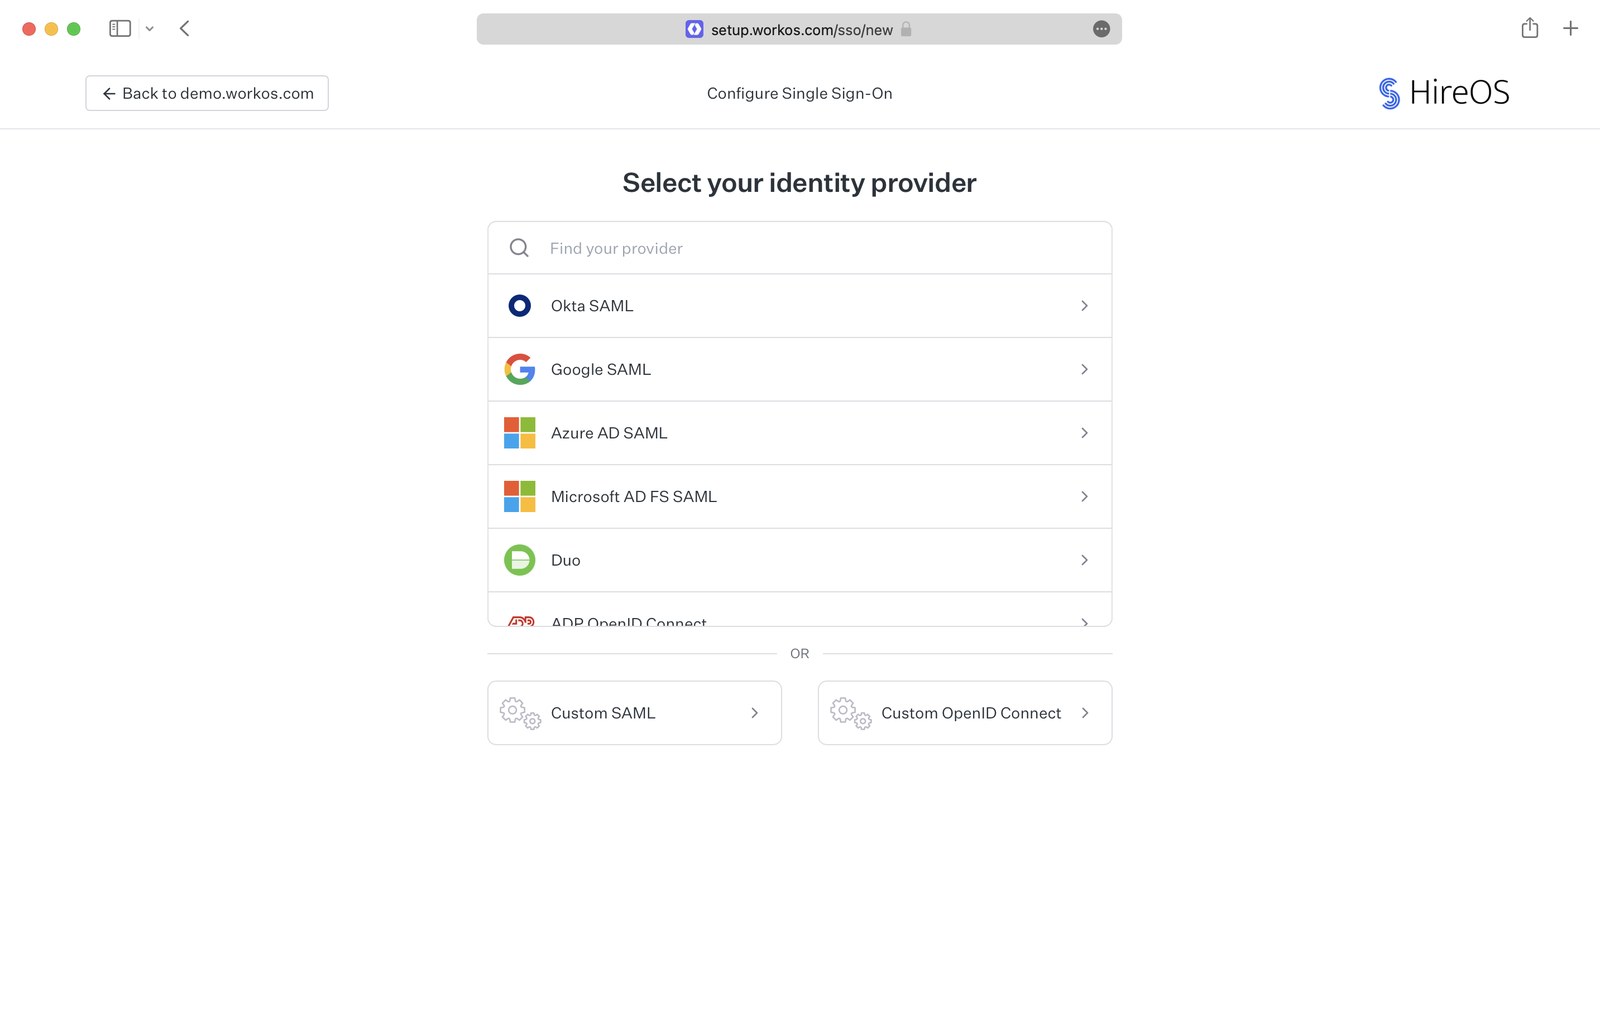
After you choose, the portal becomes a numbered wizard: a step list on the left, one step at a time on the right, each ending with a confirmation checkbox and Continue. The steps are written for your specific provider and show the exact fields in its admin console.
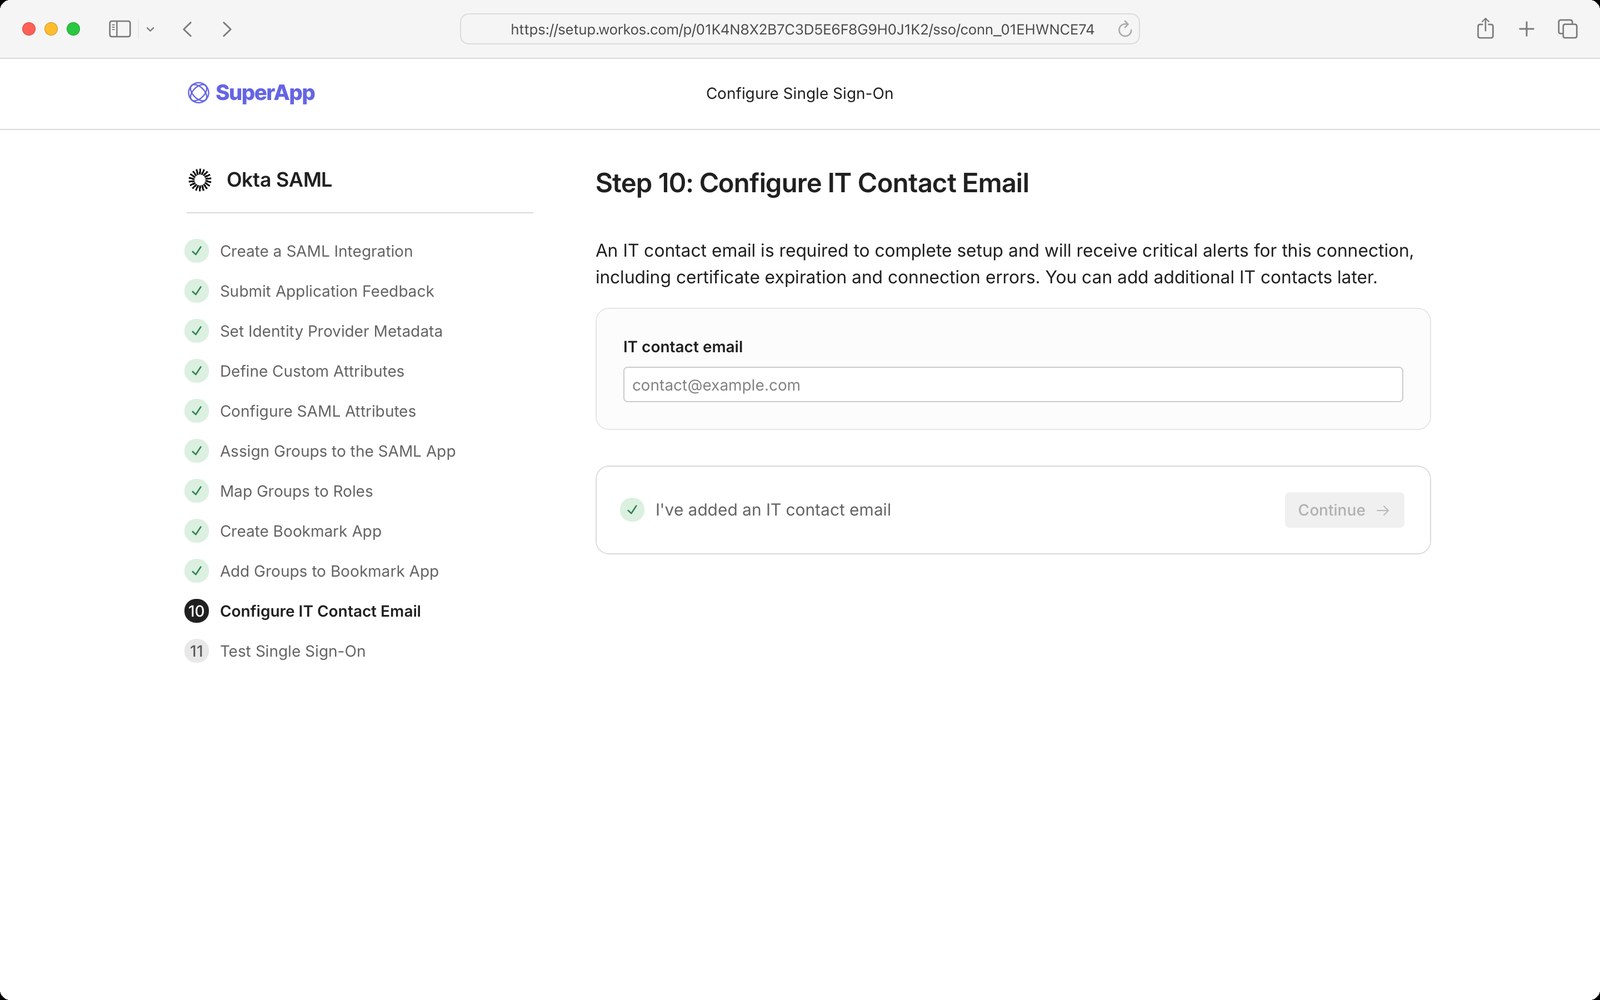
The portal may also ask for an IT contact email. That address receives certificate-expiry warnings and connection errors from WorkOS. Use a team mailbox rather than one person's.
06Step 4Your identity provider
How do I set up Microsoft Entra ID?
This is the walkthrough for Entra ID with SAML, the most common case. Okta, Google Workspace, and other providers are covered in the appendix, and the wizard shows the same steps for your provider as you go.
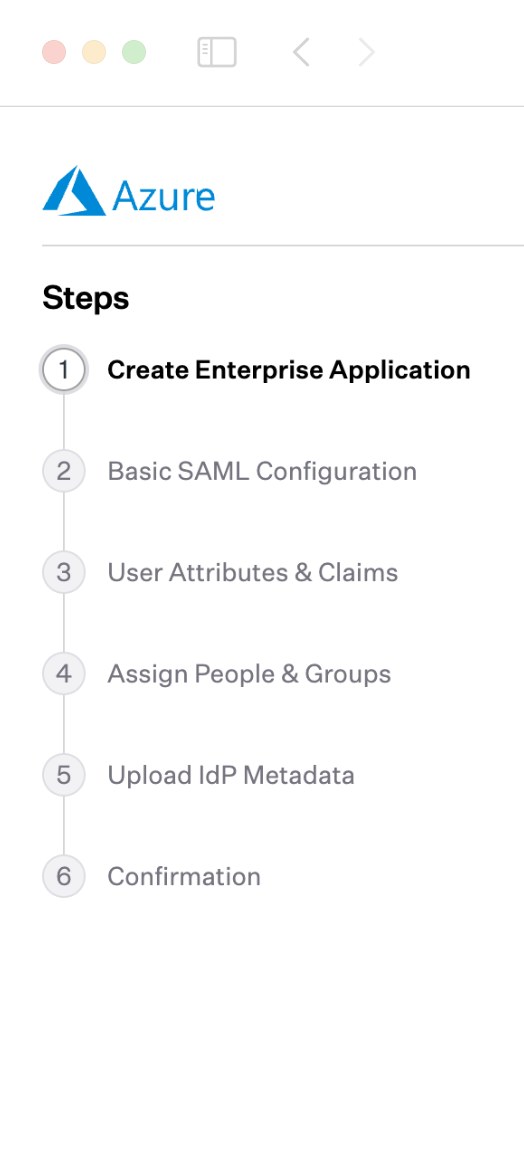
For Entra, the wizard's step list is: Create Enterprise Application, Basic SAML Configuration, User Attributes & Claims, Assign People & Groups, Upload IdP Metadata, Confirmation.
4a. Copy the two values WorkOS gives you
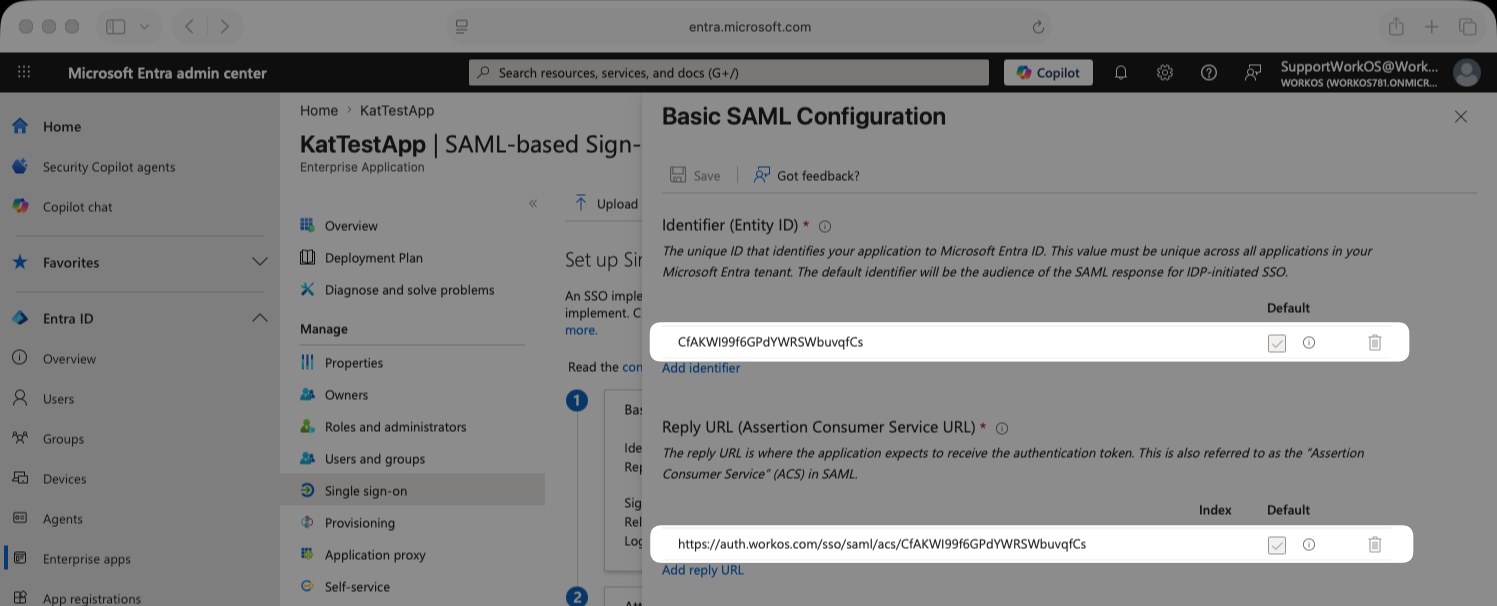
The portal shows the Service Provider Details for your connection: SP Entity ID, ACS URL, and an SP Metadata URL. You will paste the first two into Entra.
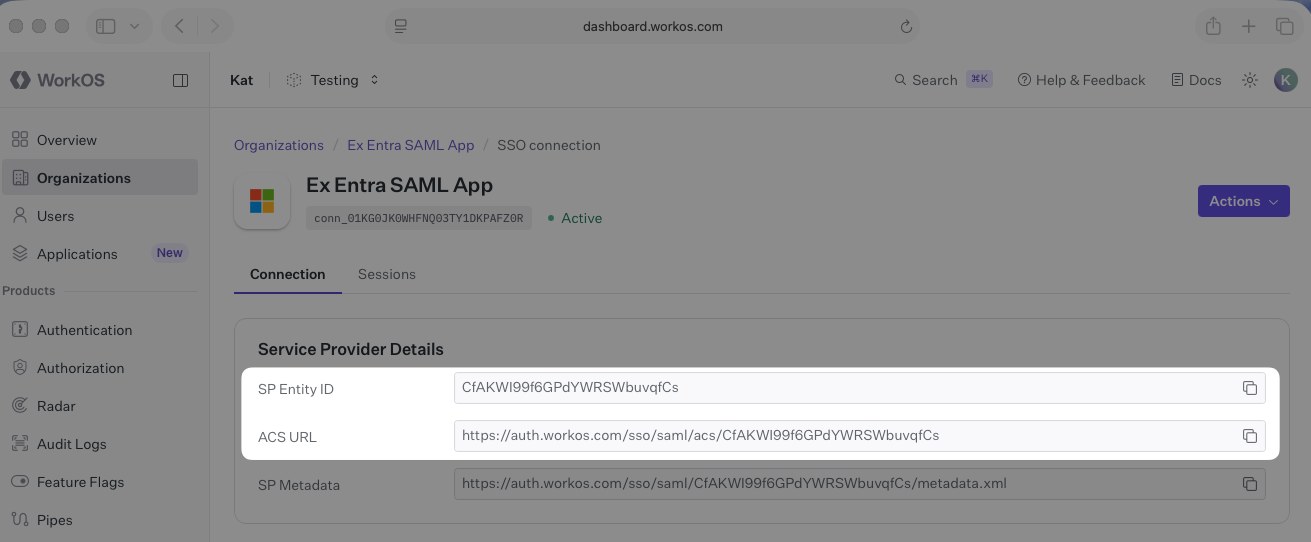
| WorkOS shows | Enter it in Entra as |
|---|---|
| SP Entity ID (an opaque string, not a URL) | Identifier (Entity ID) |
| ACS URL (https://auth.workos.com/sso/saml/acs/...) | Reply URL (Assertion Consumer Service URL) |
4b. Create the enterprise application
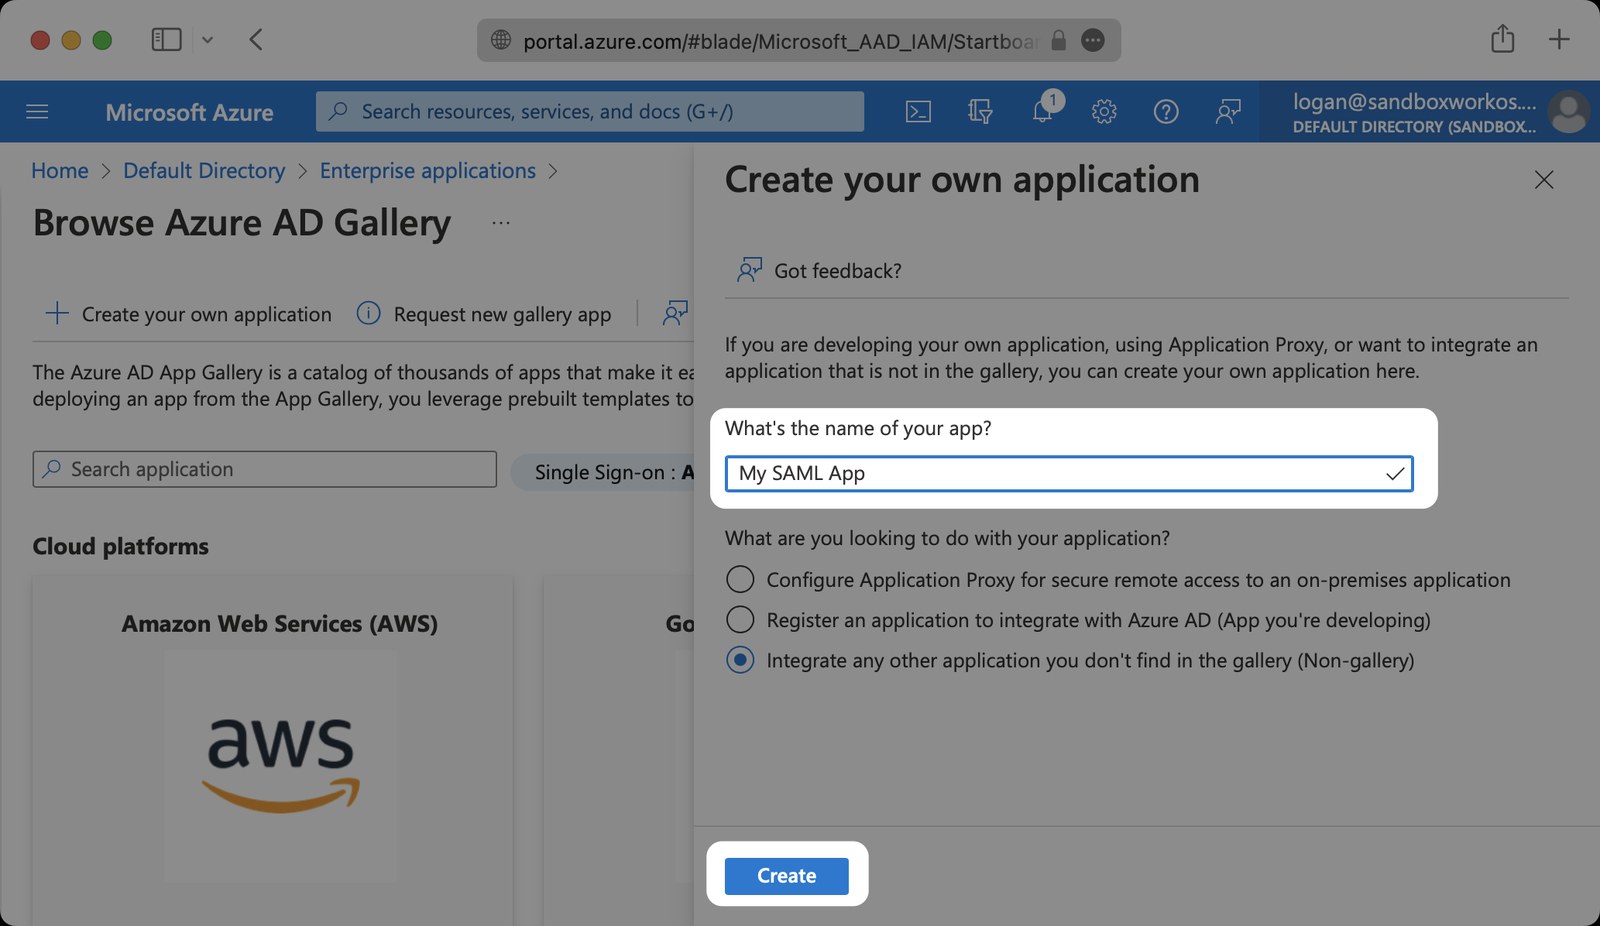
In the Entra admin center, open Enterprise applications, choose New application, then Create your own application. Name it EveryoneSocial, select Integrate any other application you don't find in the gallery (Non-gallery), and click Create. If you already created the application earlier, open it and skip to 4f.
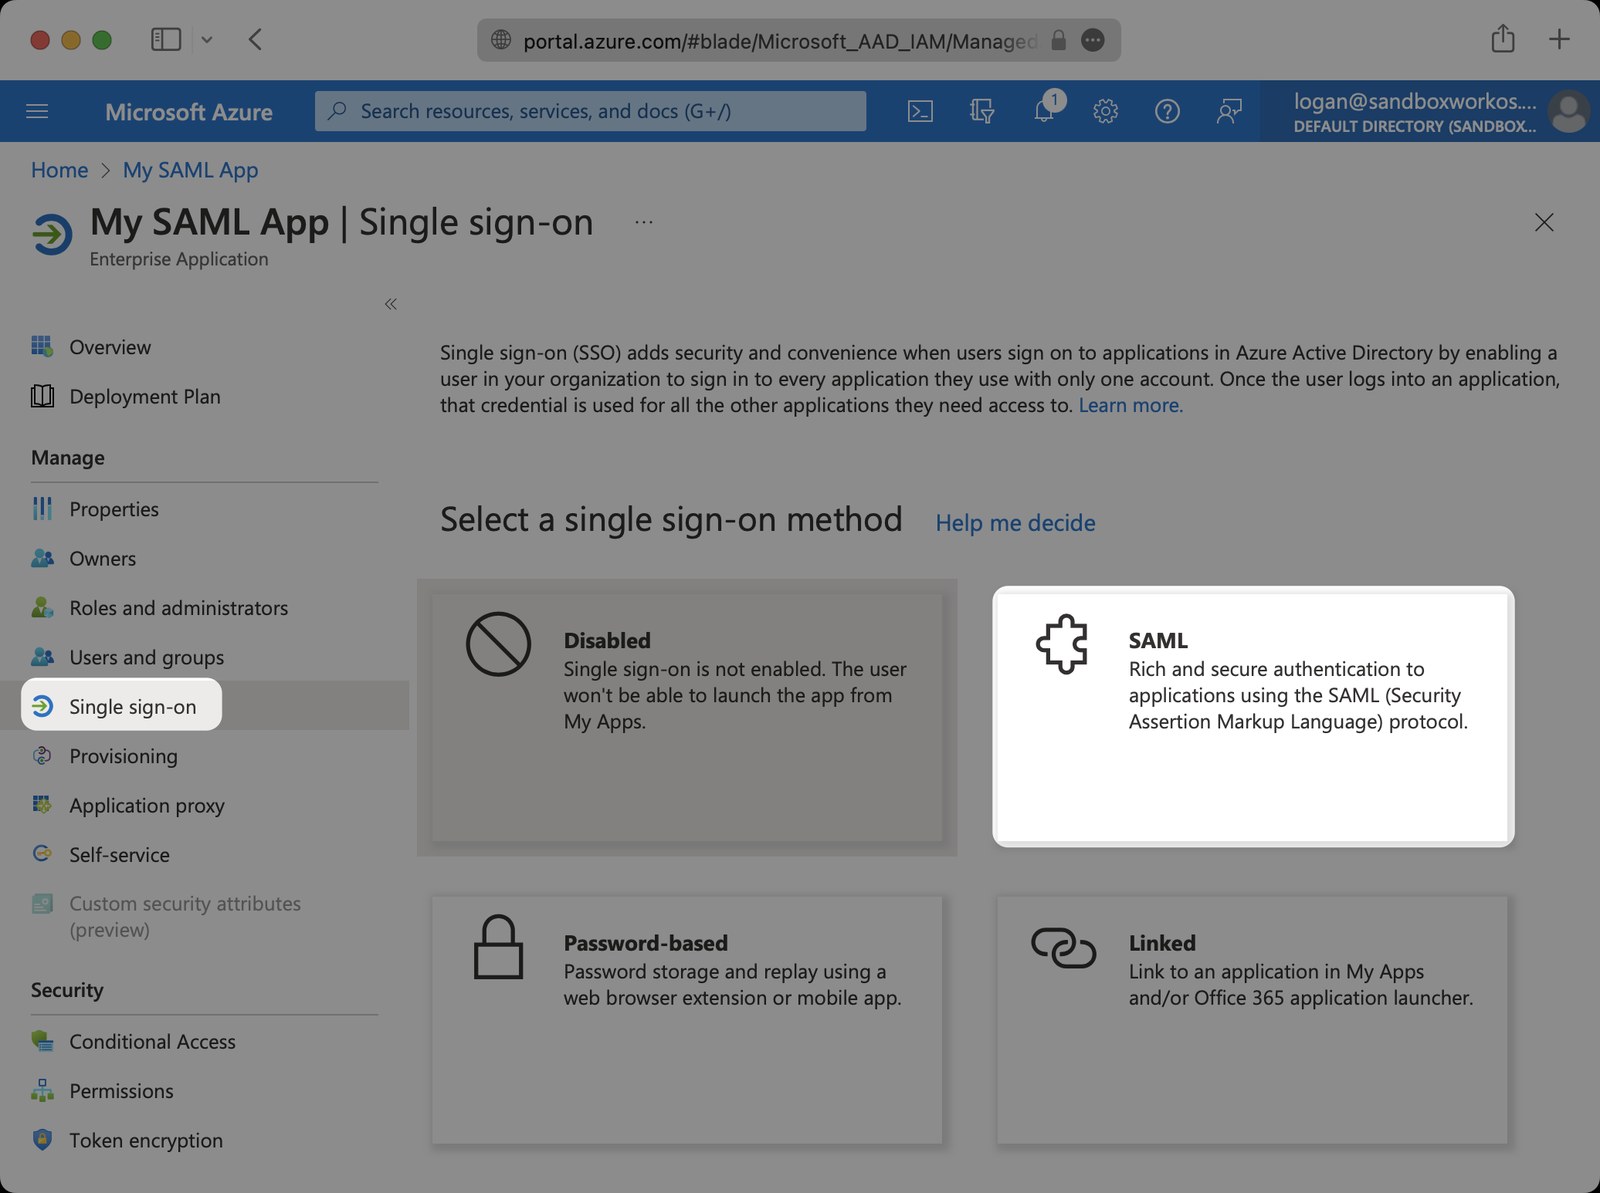
Open the new application, choose Single sign-on in the left menu, and select SAML.
4c. Basic SAML Configuration
Edit section 1, Basic SAML Configuration. Enter the SP Entity ID as Identifier (Entity ID) and the ACS URL as Reply URL (Assertion Consumer Service URL). Sign on URL can stay empty for this application. Save.
Note
SAML sign-on is only configurable on single-tenant or gallery applications in Entra. An application created with Create your own application is single-tenant, so this is fine. If your team wants to reuse an existing multi-tenant registration, SAML will be greyed out.
4d. Attributes & Claims
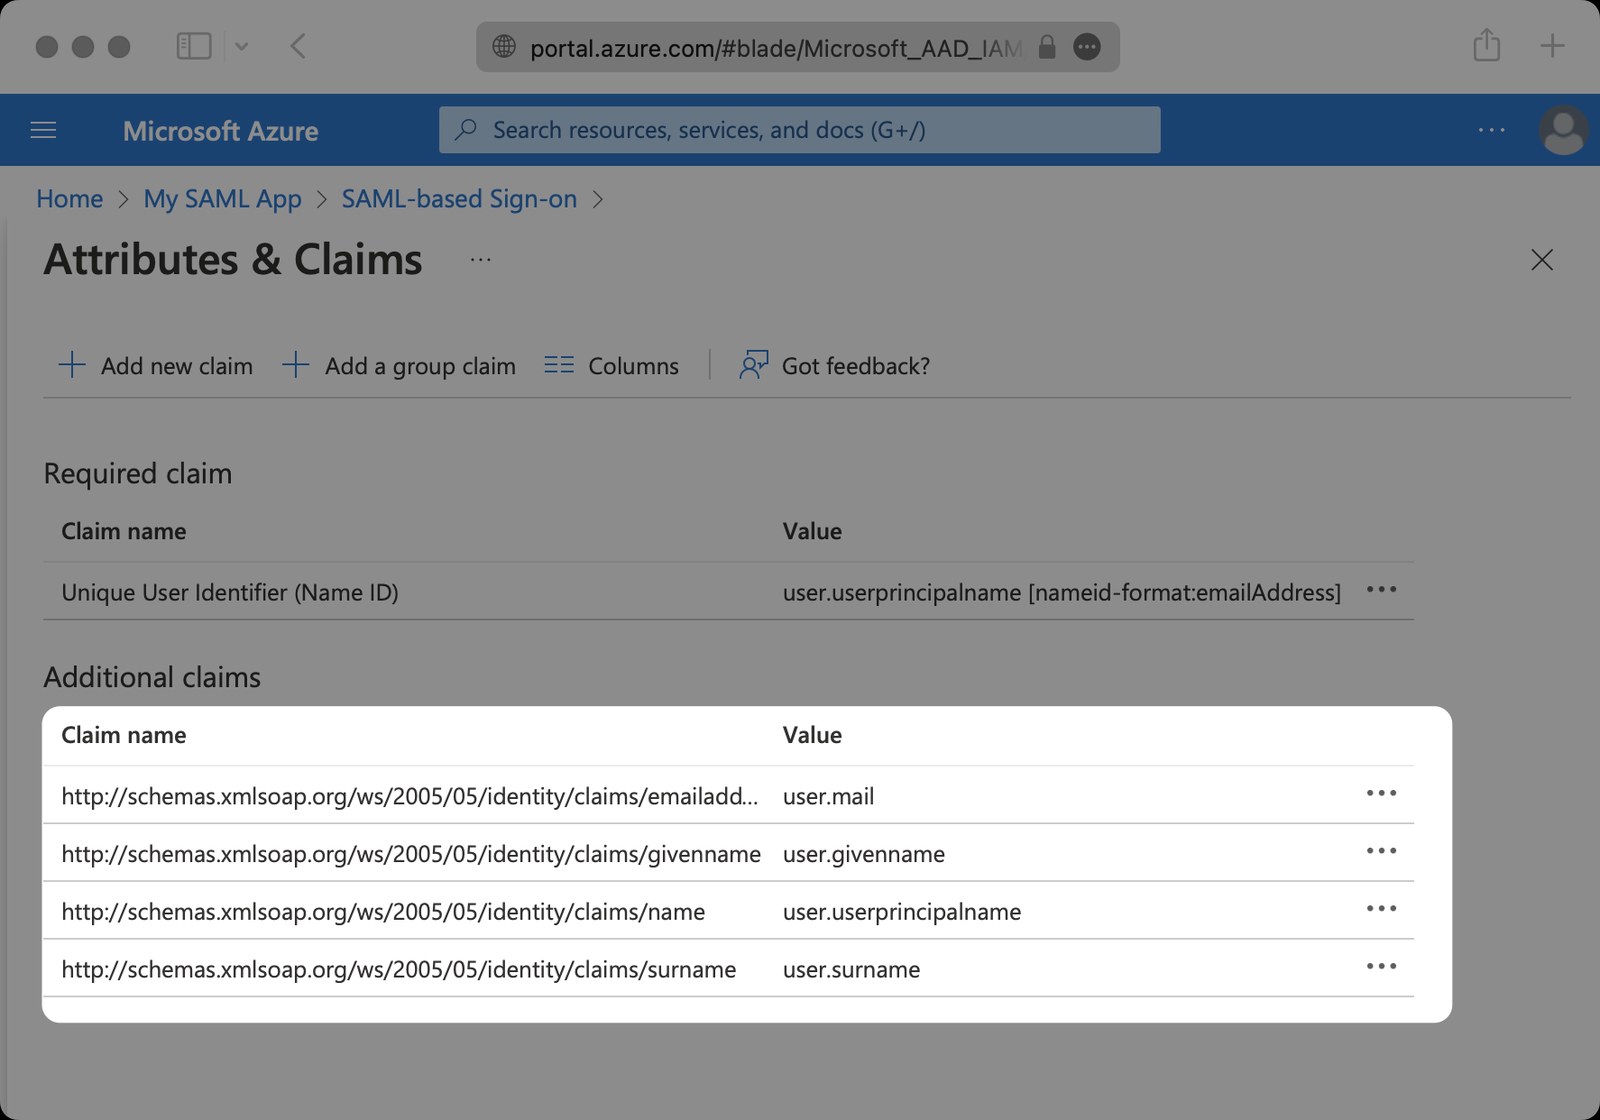
Edit section 2, Attributes & Claims. Leave Unique User Identifier (Name ID) as user.userprincipalname and make sure these four additional claims exist. The Namespace on each must end in /claims.
| Claim name | Value |
|---|---|
| http://schemas.xmlsoap.org/ws/2005/05/identity/claims/emailaddress | user.mail |
| http://schemas.xmlsoap.org/ws/2005/05/identity/claims/givenname | user.givenname |
| http://schemas.xmlsoap.org/ws/2005/05/identity/claims/name | user.userprincipalname |
| http://schemas.xmlsoap.org/ws/2005/05/identity/claims/surname | user.surname |
Important
The email claim is the identity EveryoneSocial matches on. It must carry the same work address people already use in the workspace, otherwise an existing member arrives as a stranger. If some accounts have no user.mail value (for example synced accounts without a mailbox), fix that before they sign in.
4e. Assign users or groups
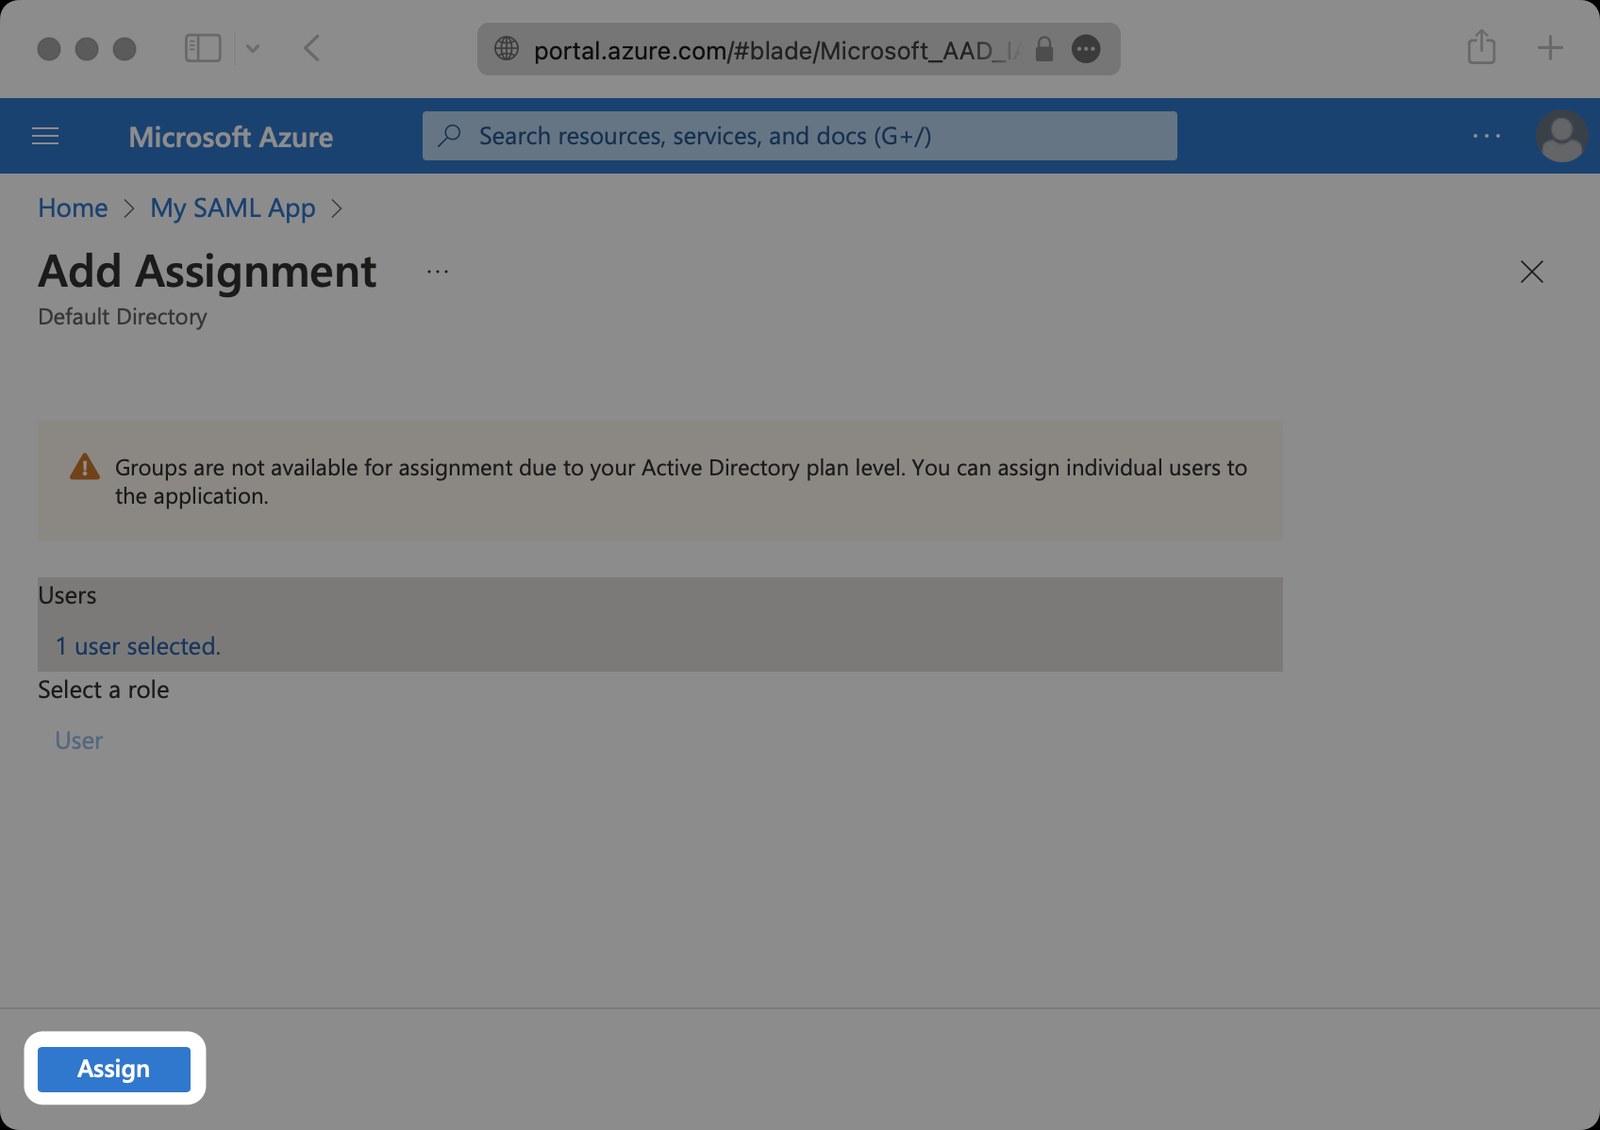
Open Users and groups for the application, click Add user/group, pick the people or the group who will use EveryoneSocial, and click Assign. Anyone not assigned cannot sign in, whatever EveryoneSocial says about them.
4f. Hand WorkOS your metadata URL
Back on the application's Single sign-on page, in section 3, SAML Certificates, copy the App Federation Metadata URL.
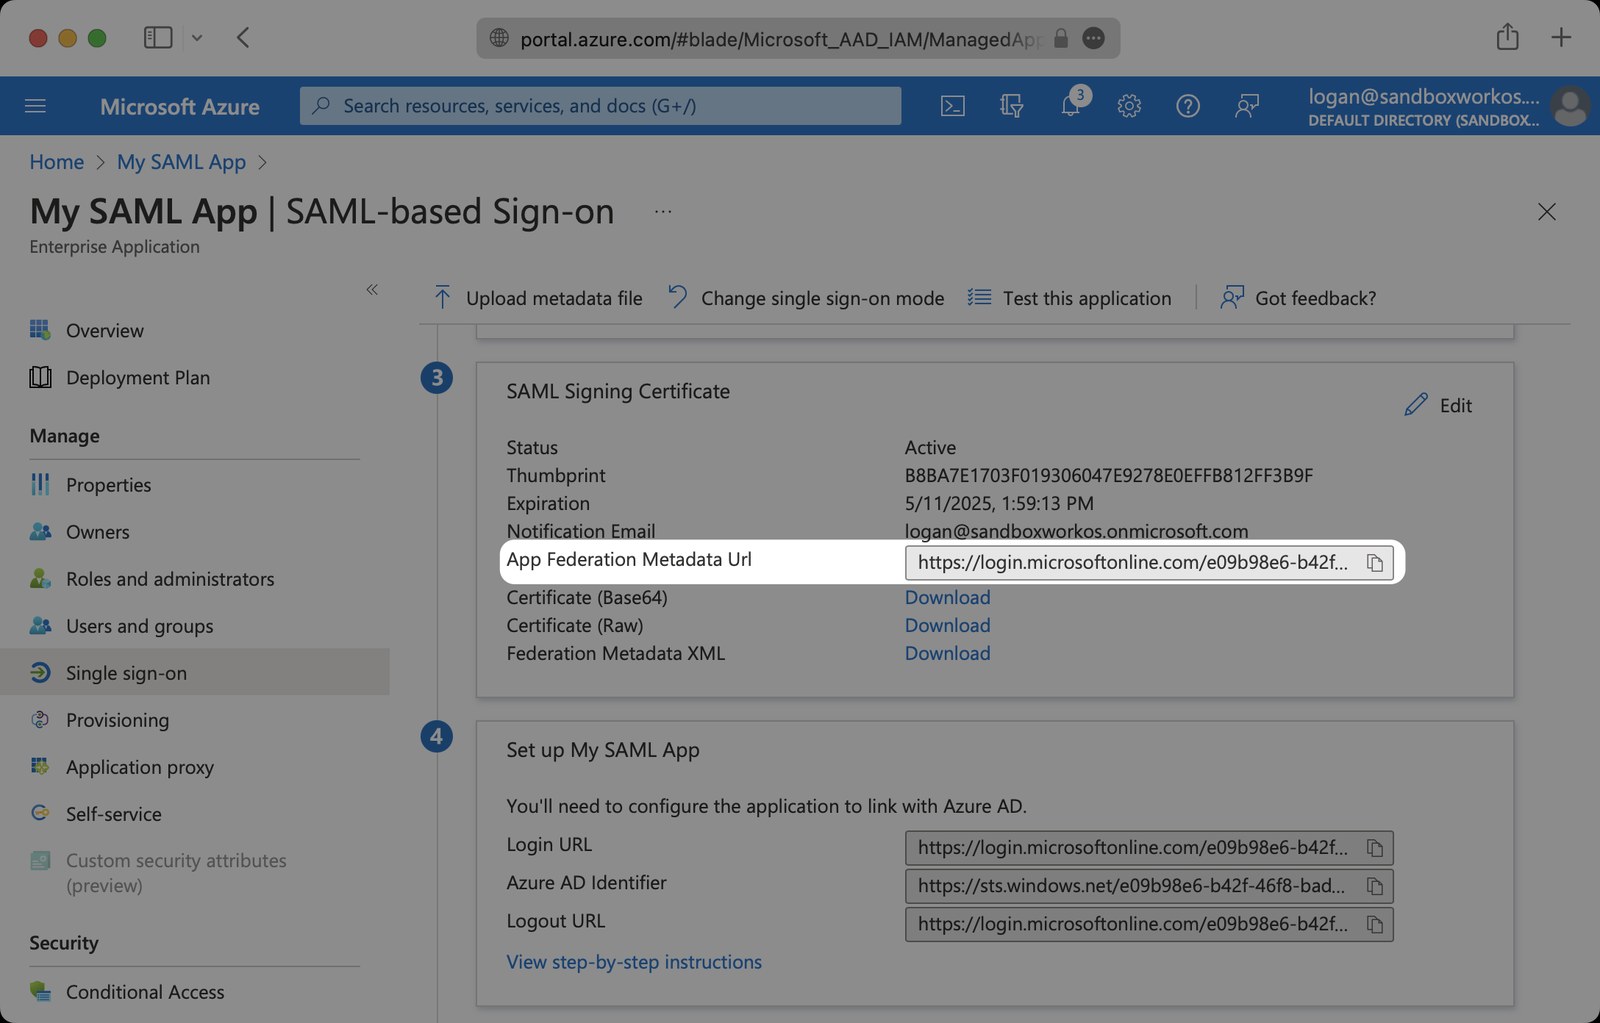
In the WorkOS portal, at the Upload IdP Metadata step, choose Dynamic configuration, paste the URL into Metadata URL, and save.
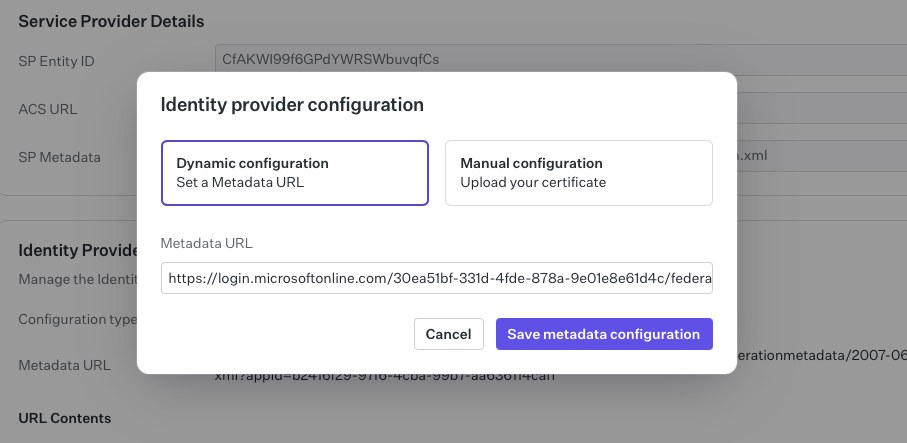
WorkOS reads the tenant's Entity ID, sign-on URL, and signing certificate from the URL and shows what it found. Because the URL is monitored, Entra's certificate rollover (the default certificate lasts three years) needs no action from anyone later. Prefer this over Manual configuration, which means someone re-uploads a certificate every time it changes.
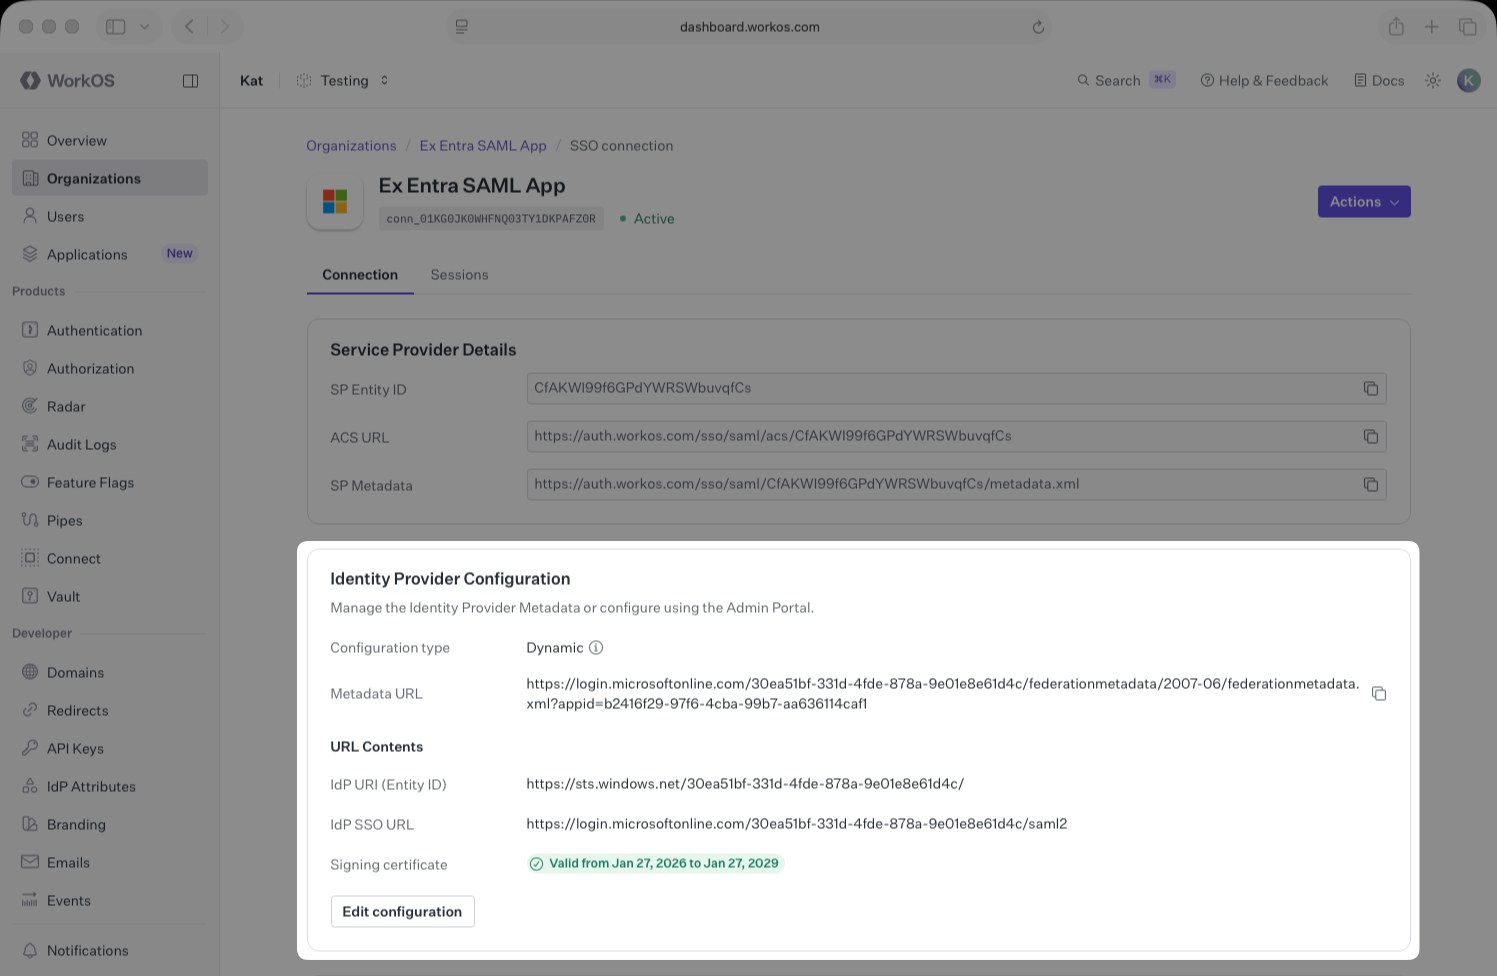
07Step 5WorkOS portal
How do I test the connection?
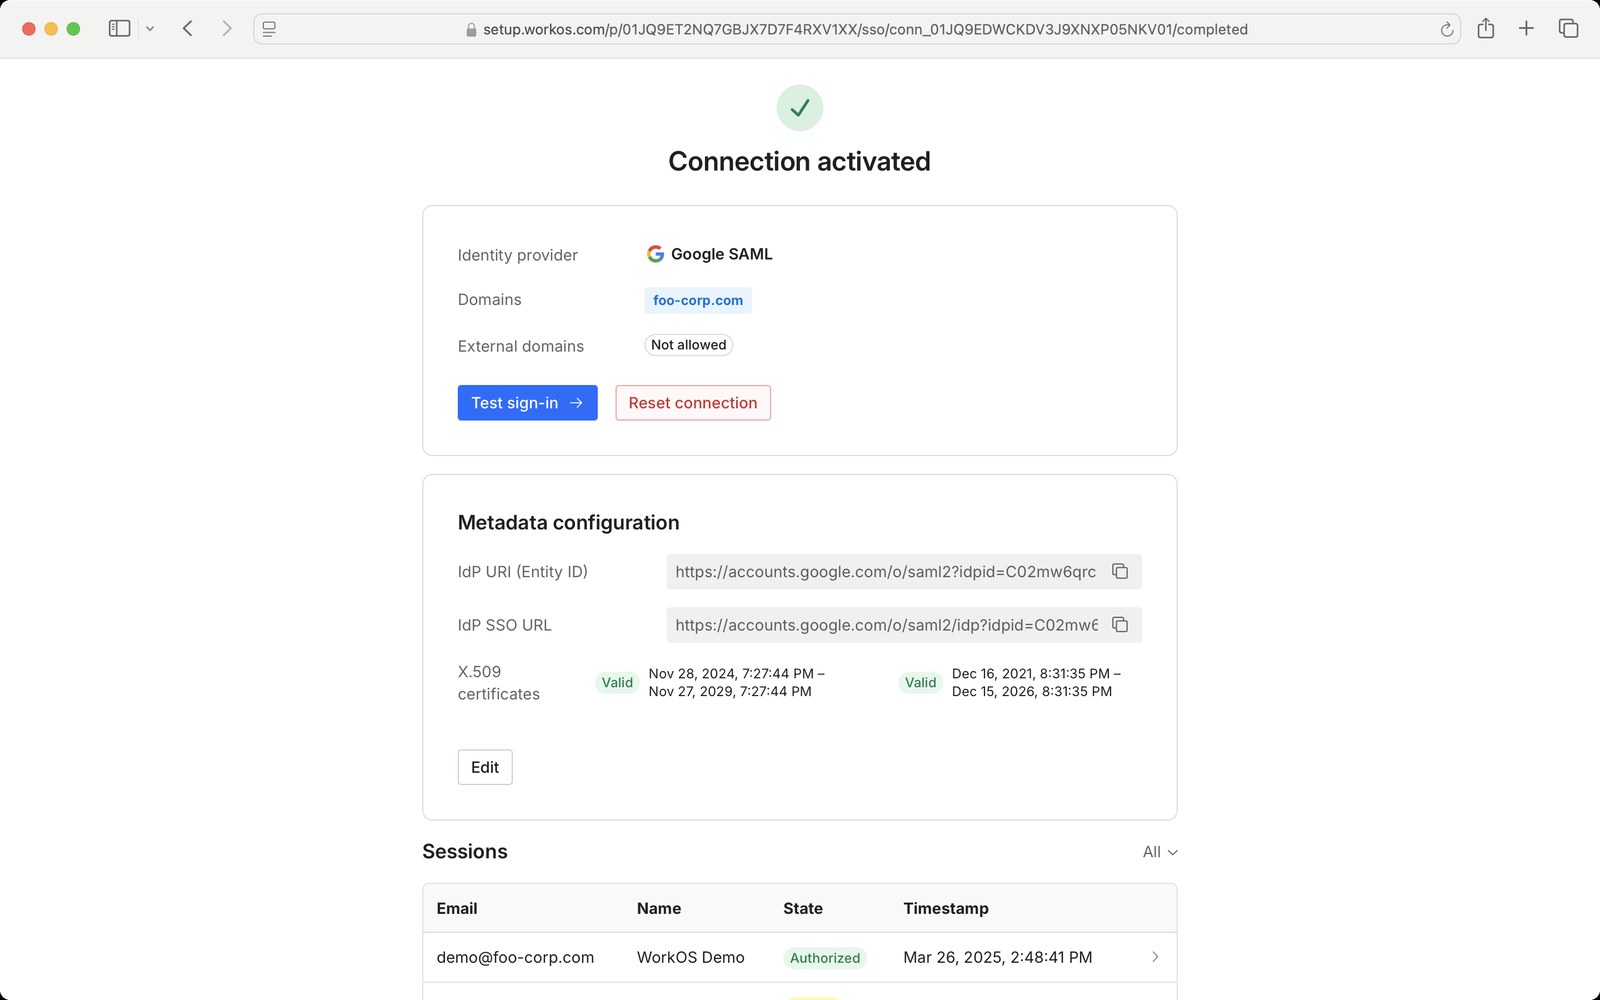
The last wizard step is Test Single Sign-On. The portal's completion screen, Connection activated, has a Test sign-in button: sign in with an assigned account and you should land back in the portal as an authorized session. The same screen lists the Metadata configuration with an Edit button, a Sessions table with every attempt and its state, and Reset connection if you need to start over.
Note
A connection shows Active only after its first successful sign-in. A correctly configured connection that nobody has used yet reads Validating, which is not an error. If a test fails, open the row in the Sessions table: it holds the request sent to your identity provider and the response that came back, which is usually enough to spot a wrong claim or an unassigned user.
When you are done, use the portal's back control to return to the Access page. The Single sign-on card now reads Connected with your connection type, and the button sits under Manage the connection instead of Connect an identity provider. To change anything later, click Configure SSO again.
08Step 6EveryoneSocial
How do I verify my domain?
Requiring SSO applies only to people on a verified workspace domain, so this step is what makes Step 8 possible. Back on Access, click Verify domains in the Single sign-on card. The portal opens on Verify your domain. Domains you already added on the Access page are listed there, so you do not type them twice.
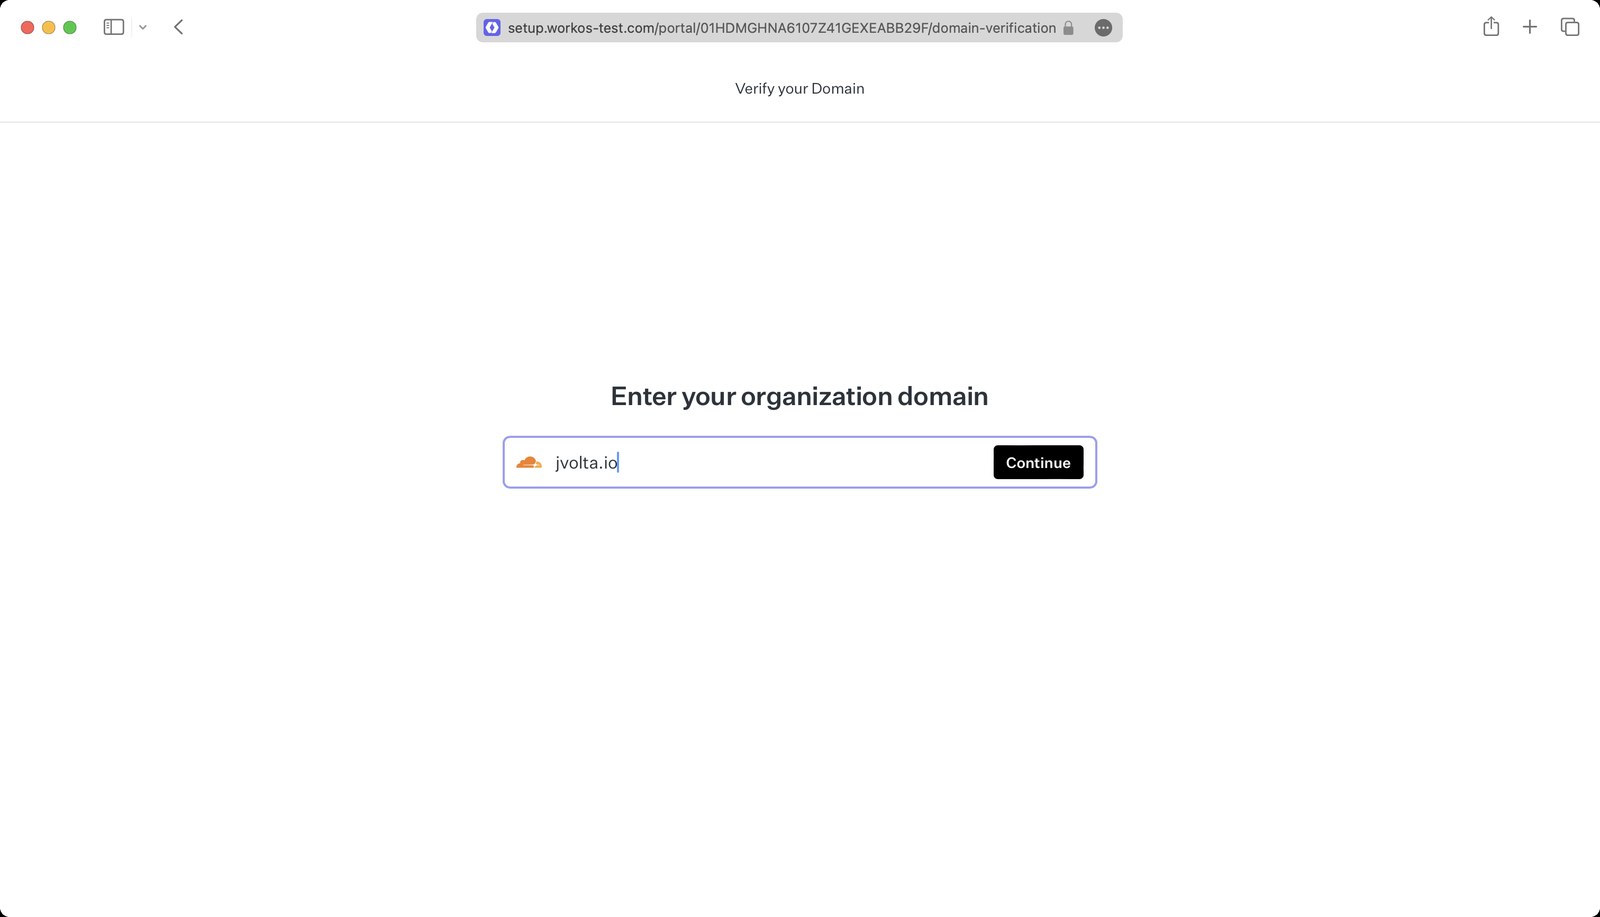
The portal detects your DNS provider and shows tailored instructions for adding one TXT record. Copy the record name and value exactly as displayed. The value has the form verification_token=<token>.
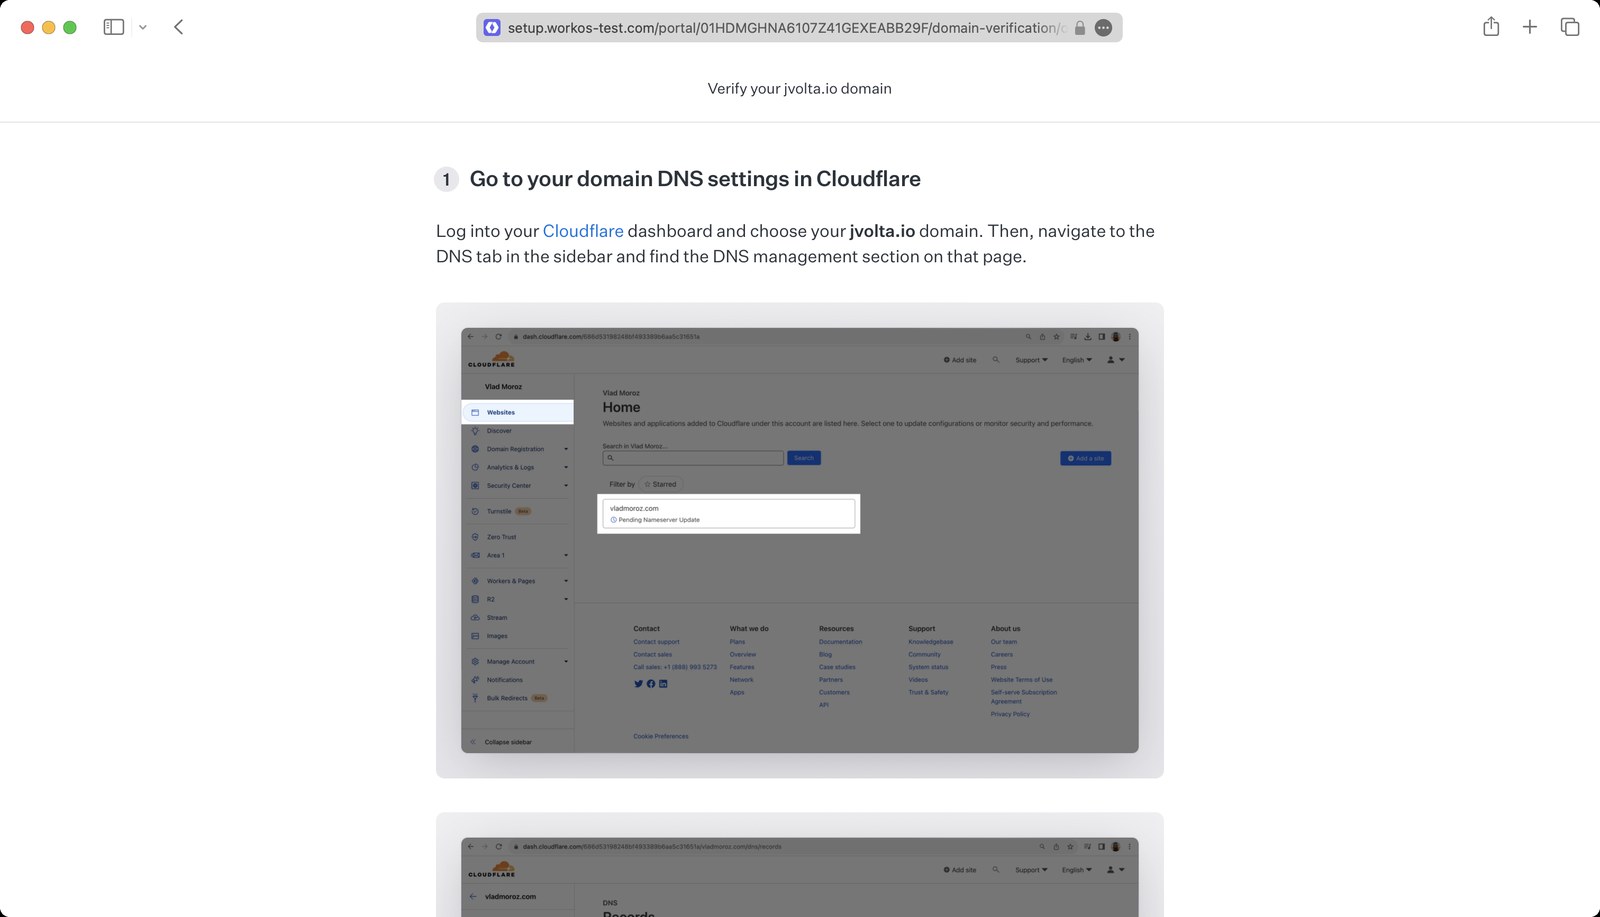
WorkOS checks for the record on its own; there is no button to press on that side. DNS propagation can take up to 48 hours depending on your TTLs, and the domain moves to Verification failed if no record is found within 30 days, from where Restart verification begins again. Leave the record in place after verification.
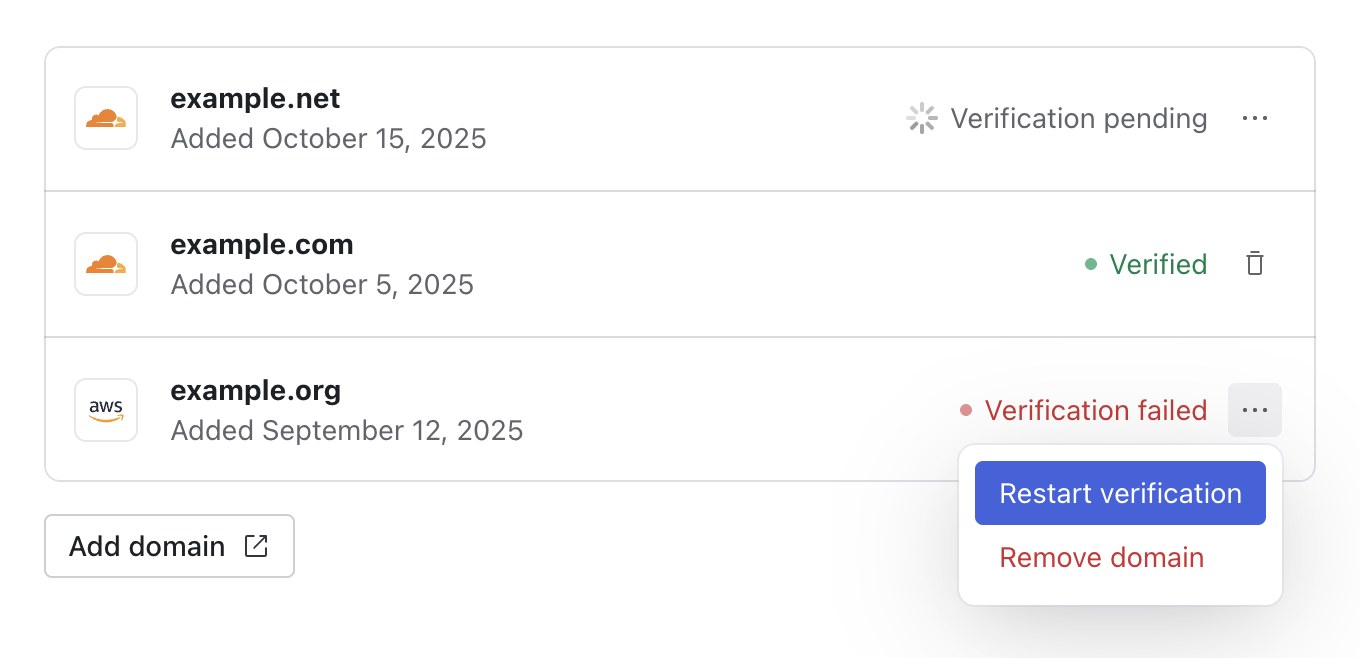
On the Access page, each workspace domain carries a badge: Pending until ownership is proved, Verified once the DNS check passes, Confirmed when EveryoneSocial verified it for you, Not verified if a check failed. While anything is pending, an amber panel headed Ownership not confirmed yet offers Check verification, which asks WorkOS right then instead of waiting for the hourly sweep and reports exactly what it found.
09Step 7EveryoneSocial
How do I confirm a real sign-in before requiring SSO?
Until SSO is required, the sign-in page keeps sending one-time email links, so a plain sign-in does not prove the connection. Two ways to prove it:
- The Test sign-in button in the portal (Step 5).
- A test sign-in link from your EveryoneSocial contact that goes straight to your identity provider and lands in the workspace. Have one existing member use it. Their existing account is linked to their identity-provider identity on that first sign-in; nobody re-registers and nothing about their content or connections changes.
Once that works, you are ready for the switch.
10Step 8EveryoneSocial
How do I require SSO, and what happens when I do?
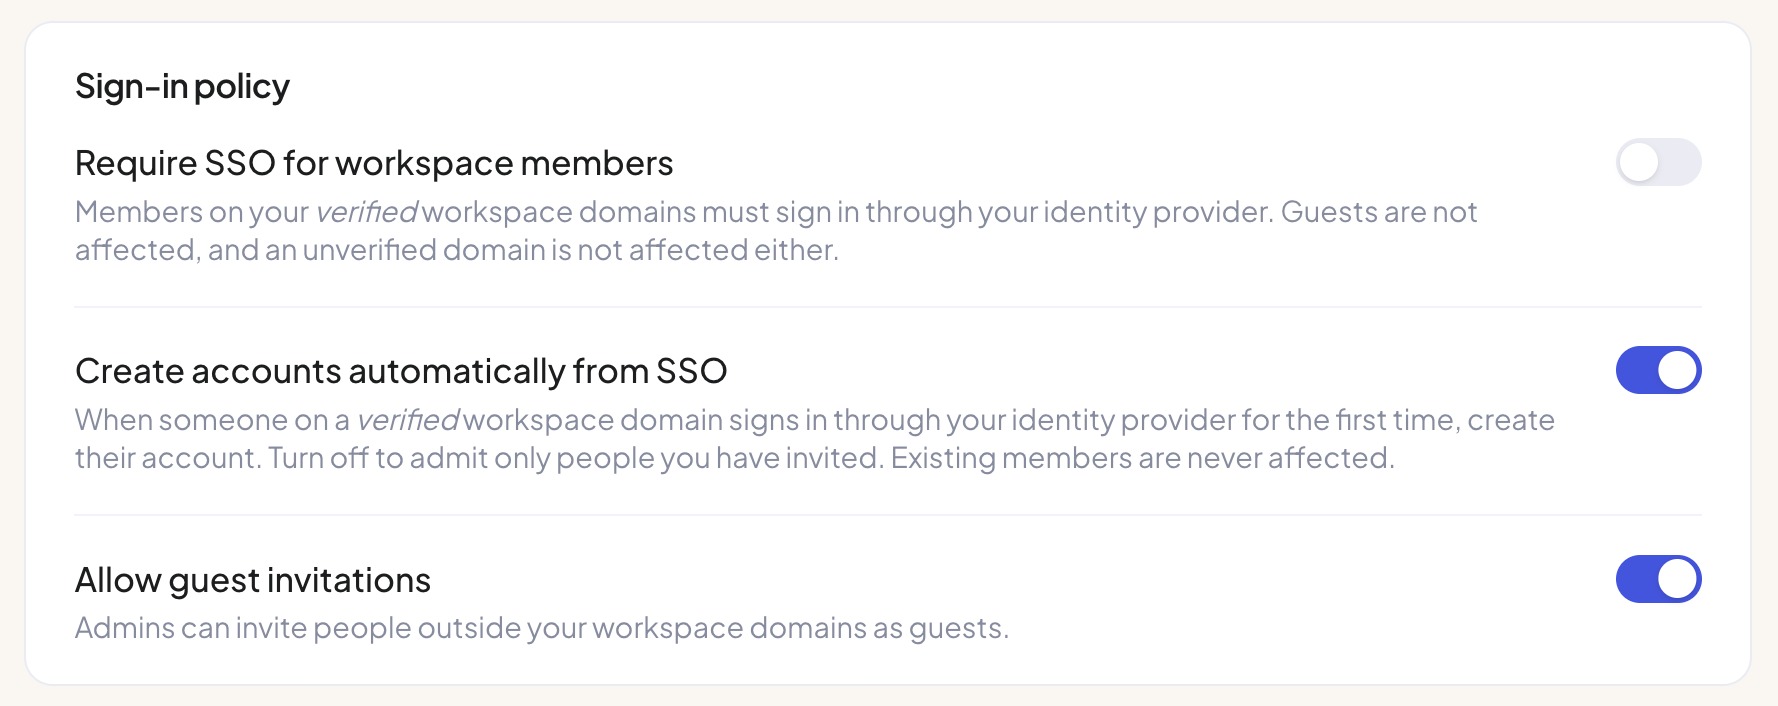
In the Sign-in policy card, turn on Require SSO for workspace members. The switch is available only when an identity provider is connected and at least one workspace domain is verified; until then its tooltip names the missing piece.
Warning
The switch is the go-live, not a rehearsal. The moment it is on, everyone in the workspace who did not sign in through your identity provider is signed out, including the admin who flipped it if they arrived by email link, and every member on your verified domains is sent to your identity provider at every sign-in from then on. Pick the moment with your program team, or with your EveryoneSocial contact, rather than clicking it on a whim.
What the requirement does and does not cover:
- Members on a verified workspace domain sign in only through your identity provider. The email field on the sign-in page hands them to your provider as soon as they type a work address. Email links, Google sign-in, and invitation links are refused for them.
- Guests invited from other domains are unaffected and keep the email link.
- Members on an unverified domain are not governed until that domain verifies.
- Existing sessions through your identity provider stay signed in and re-authenticate through it every 24 hours by default.
- Turning it off signs nobody out. It simply admits the other sign-in methods again. If your identity provider ever breaks and your own admins are locked out with everyone else, EveryoneSocial can turn the requirement off for your workspace on request, with the change recorded in your audit log.
Two neighbouring switches are worth deciding at the same time:
- Create accounts automatically from SSO. On by default. Someone on a verified domain who is assigned to the application and signs in for the first time gets an account, as an ordinary member. Turn it off to admit only people you have invited. Existing members are never affected either way.
- Allow guest invitations. Whether admins may invite partners and agencies from outside your domains at all.
11
What happens after go-live?
- Provisioning. New employees are onboarded by assigning them to the application in your identity provider. With automatic account creation on, their first sign-in creates the account. Roles are granted in EveryoneSocial by an admin under Admin, Users; a claim from your identity provider never grants an admin role.
- Deprovisioning. There is no directory sync (SCIM). Remove the person's application assignment in your identity provider to stop new sign-ins, and deactivate them in EveryoneSocial from Admin, Users (individually or by CSV) to end their sessions and revoke their connected social accounts immediately.
- Certificate rotation. With a metadata URL, WorkOS picks up a new signing certificate on its own. WorkOS also emails the IT contact when a certificate is within 90 days of expiry. If you configured manually, open Configure SSO and edit the metadata configuration before the old certificate expires.
- Changing providers or tenants. Reopen Configure SSO at any time. Some organizations register a pre-production identity tenant first and their production tenant later; the second registration is the same wizard with a fresh link, scheduled inside your change window.
12
Appendix: other identity providers
The wizard shows your provider's own steps. These are the values that cross in each direction.
Okta (SAML)
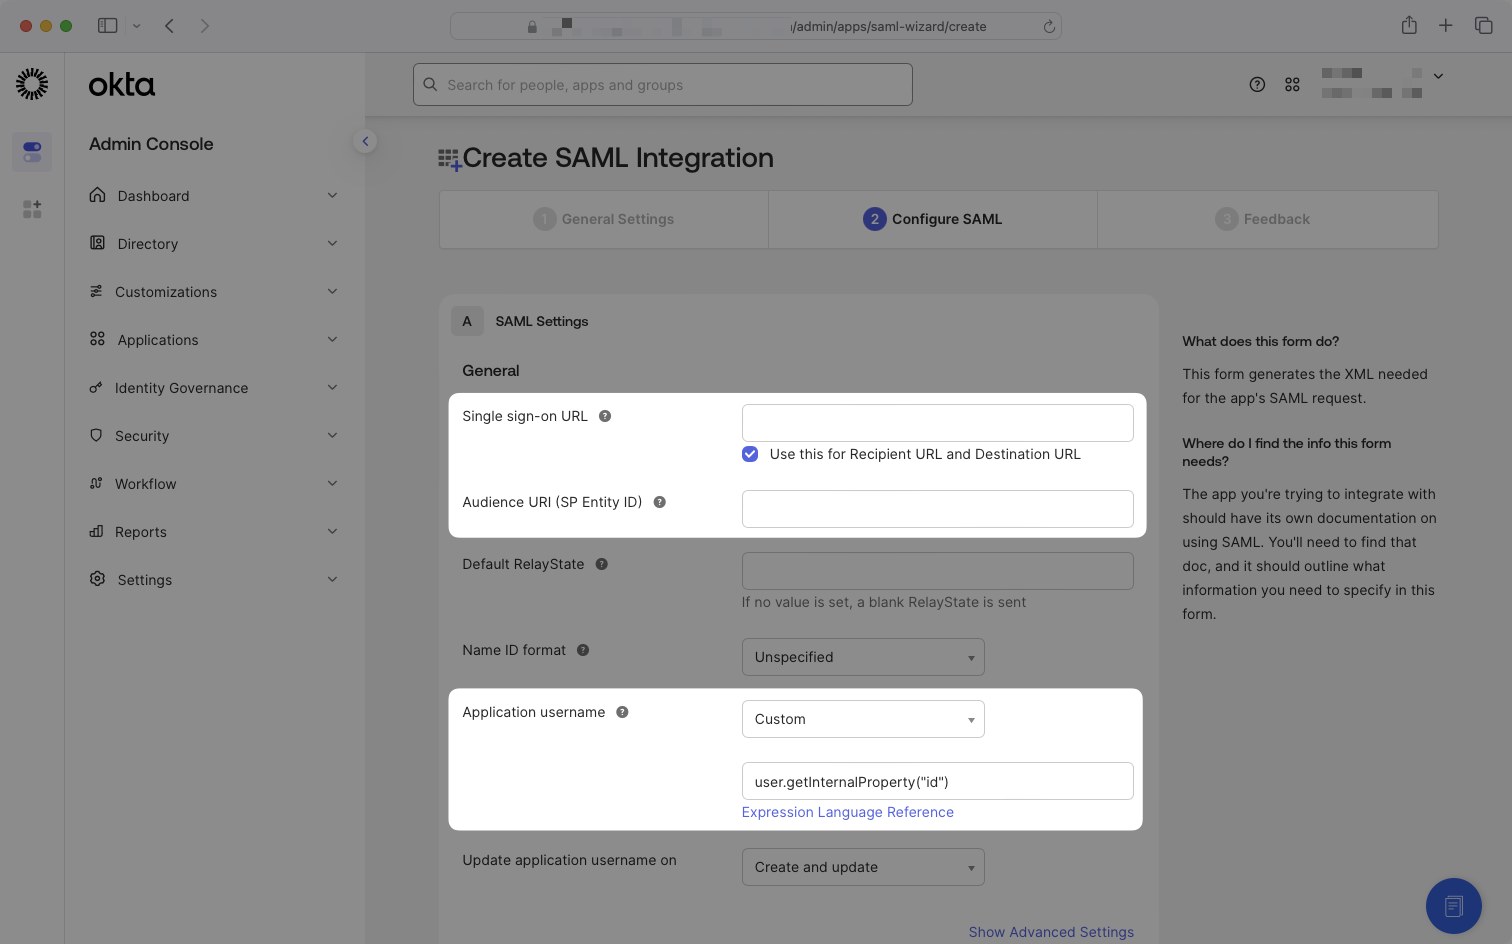
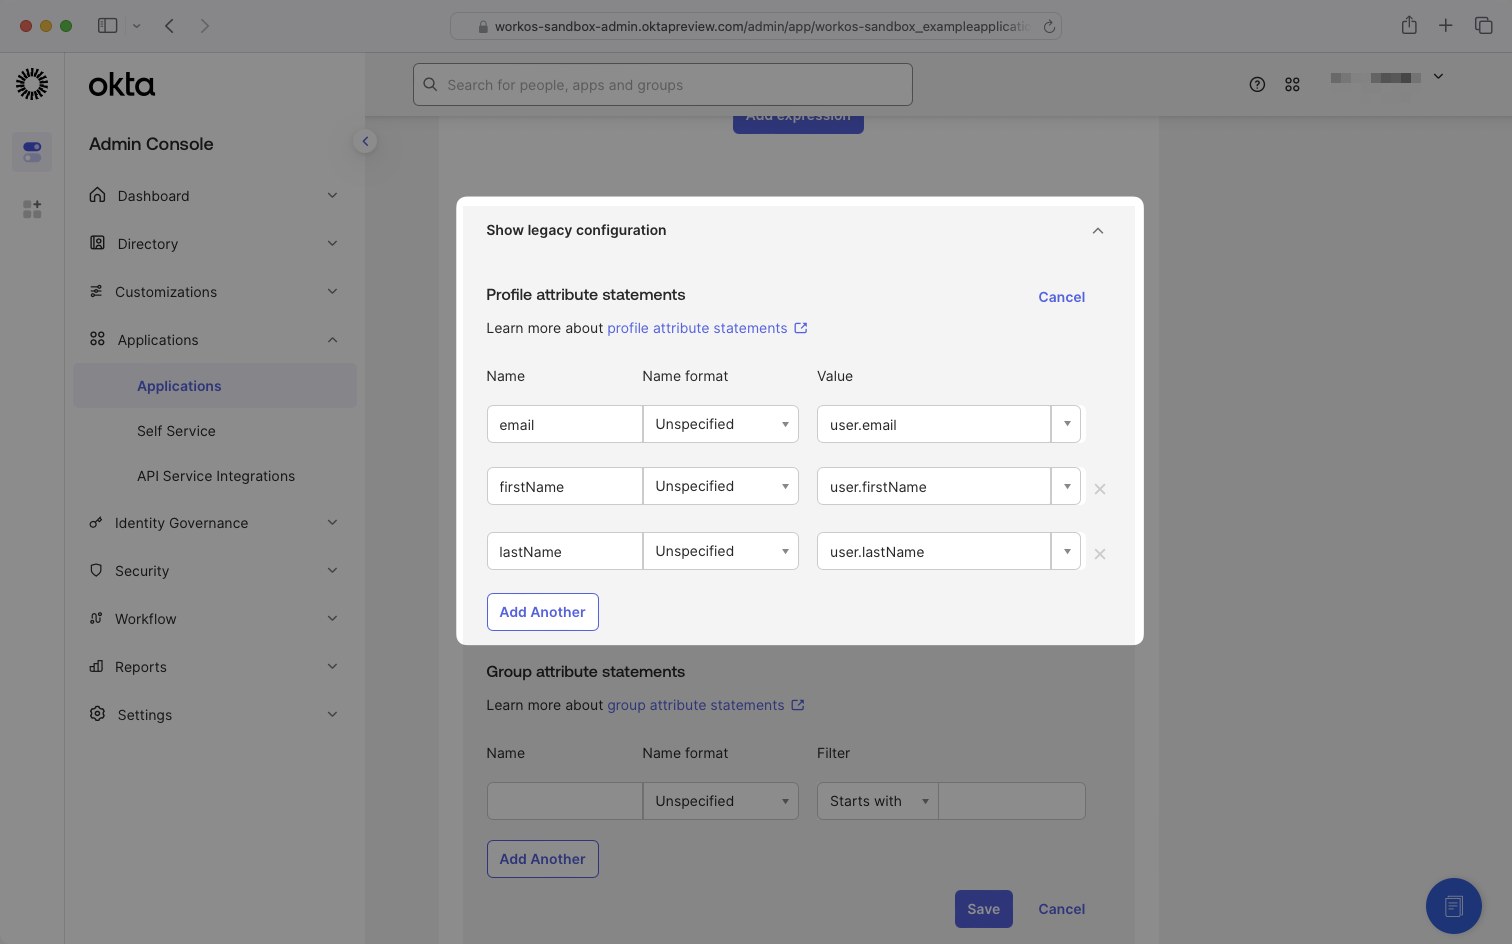
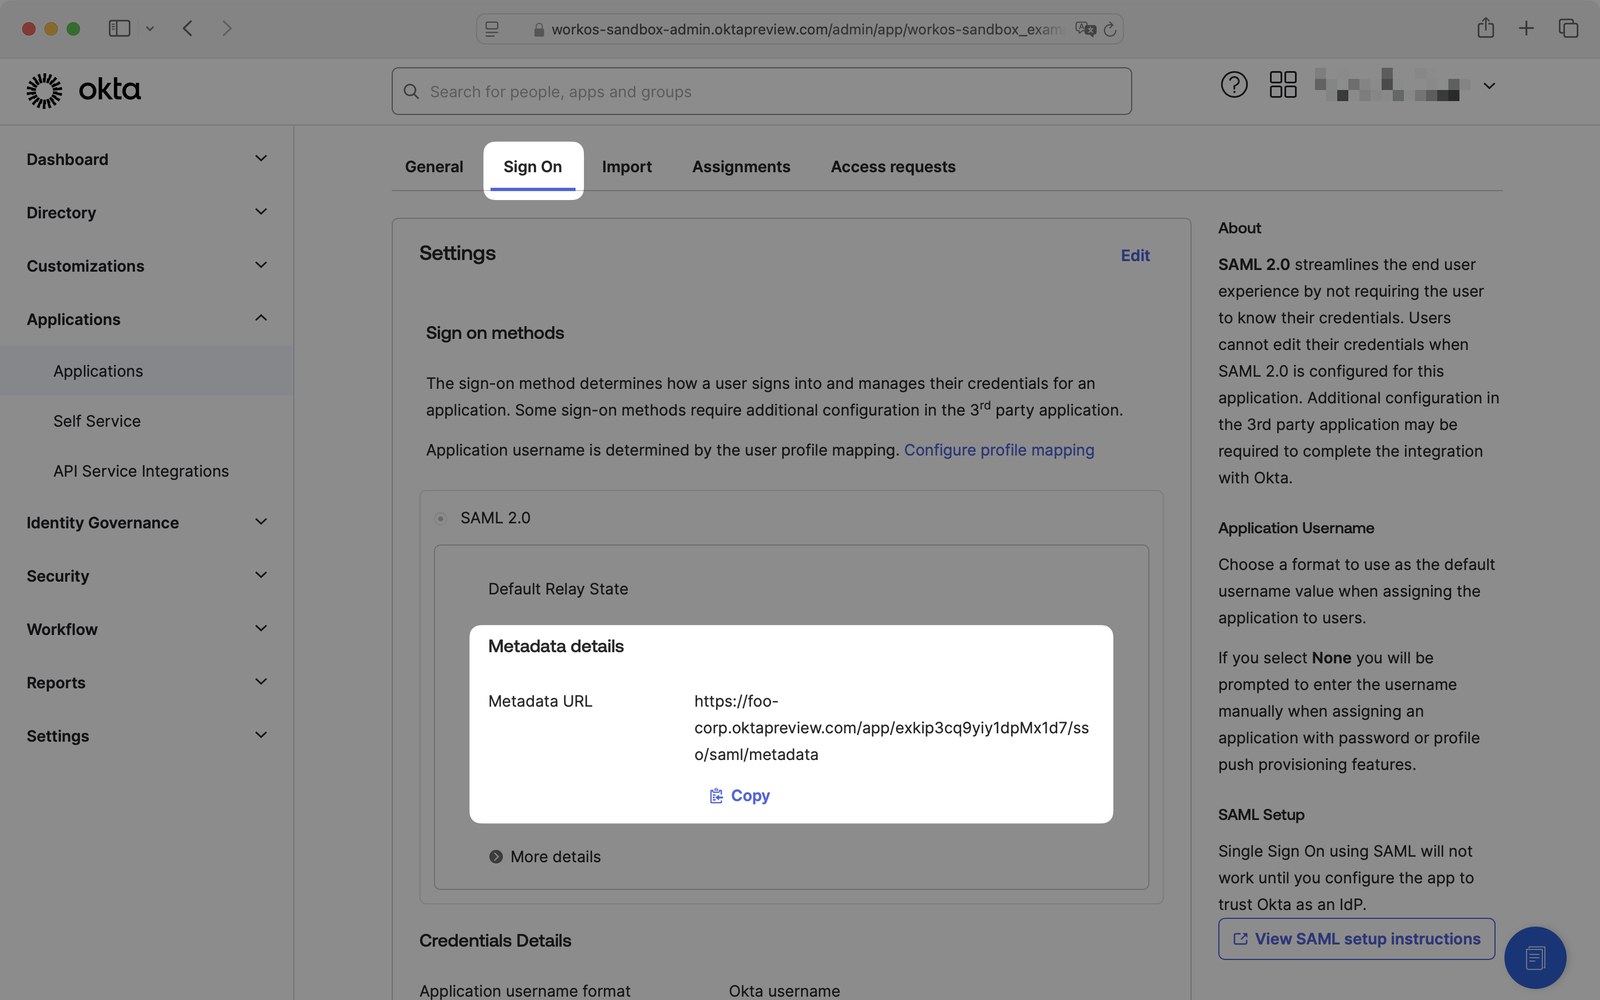
In Okta, Applications, Create App Integration, SAML 2.0. On Configure SAML, paste the ACS URL into Single sign-on URL and the SP Entity ID into Audience URI (SP Entity ID). Add attribute statements email = user.email, firstName = user.firstName, lastName = user.lastName. On the Sign On tab, copy the Metadata URL into the portal. Assign people or groups on Assignments.
Google Workspace (SAML)
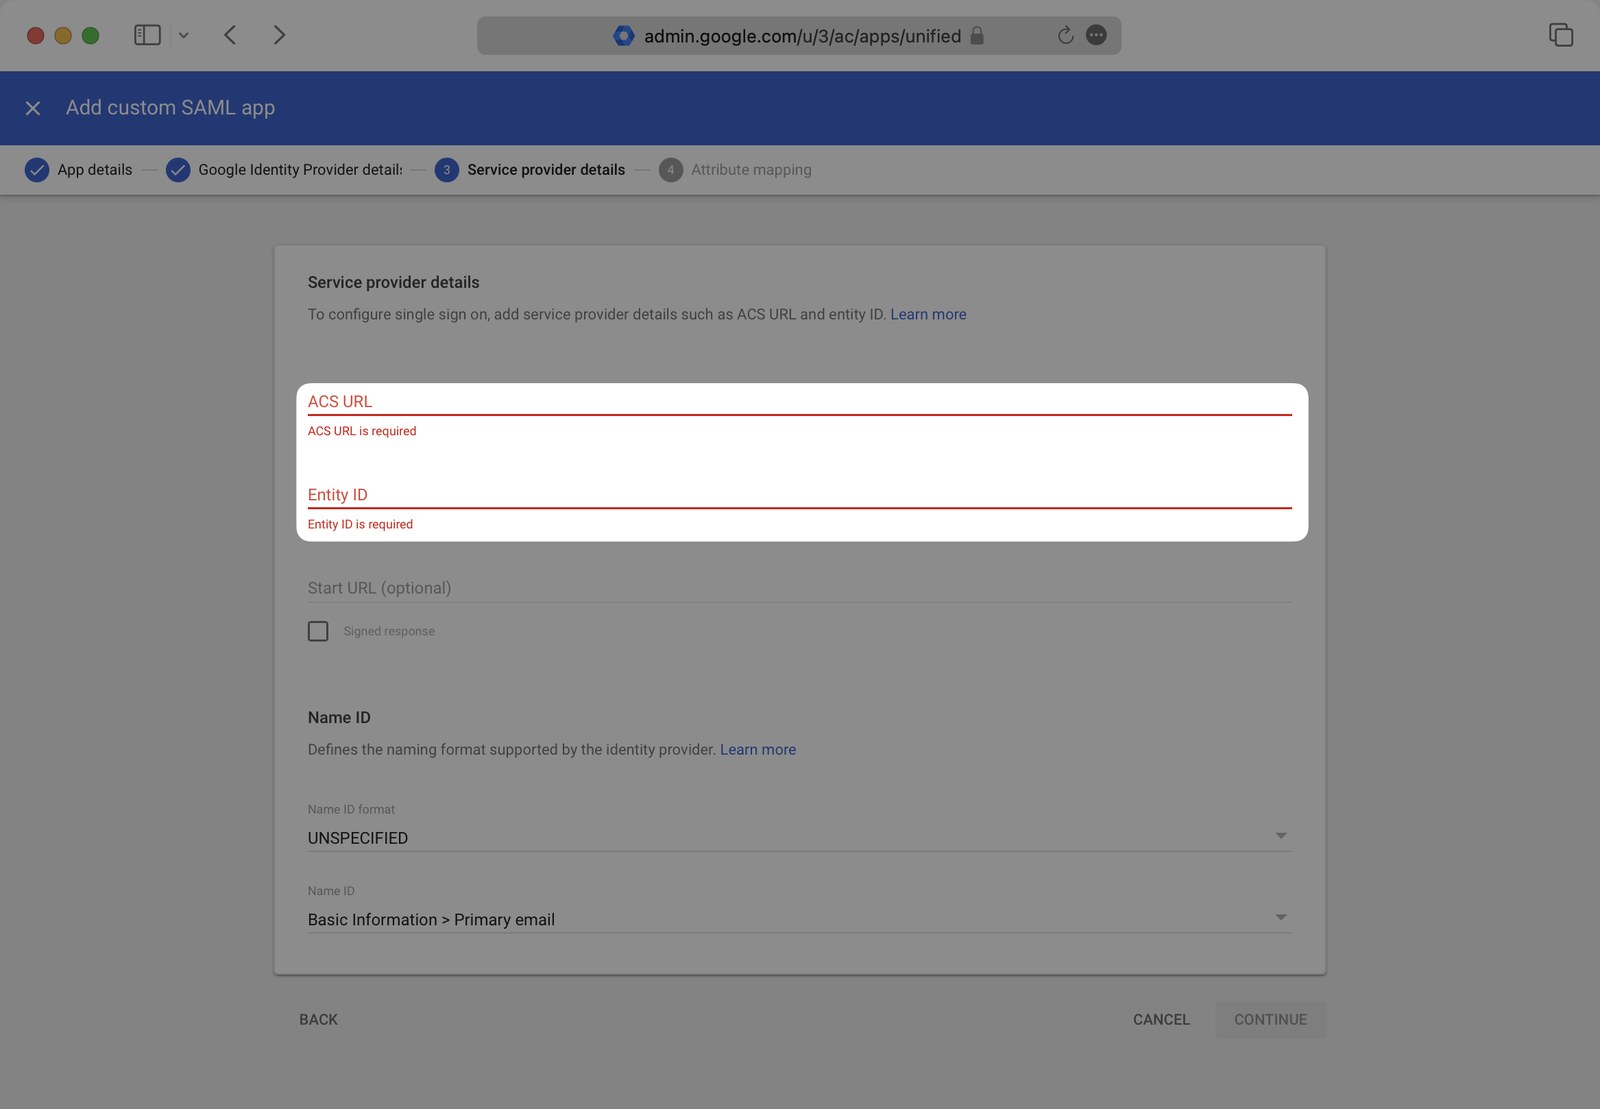
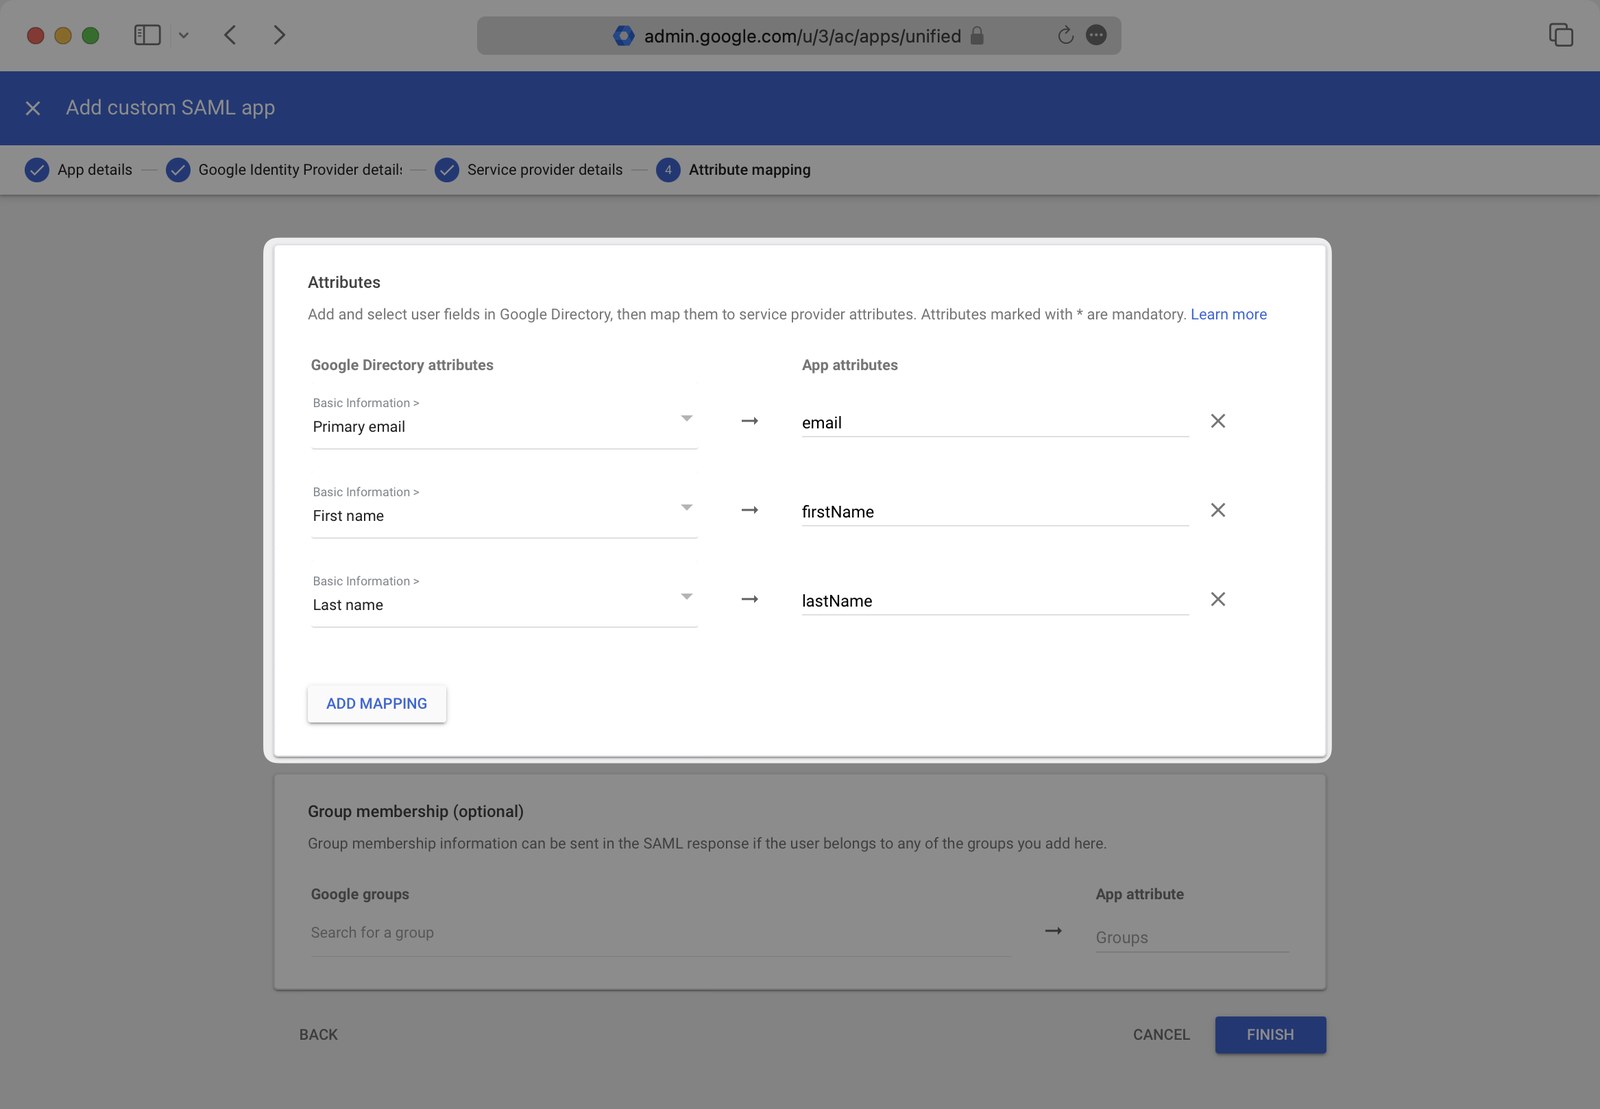
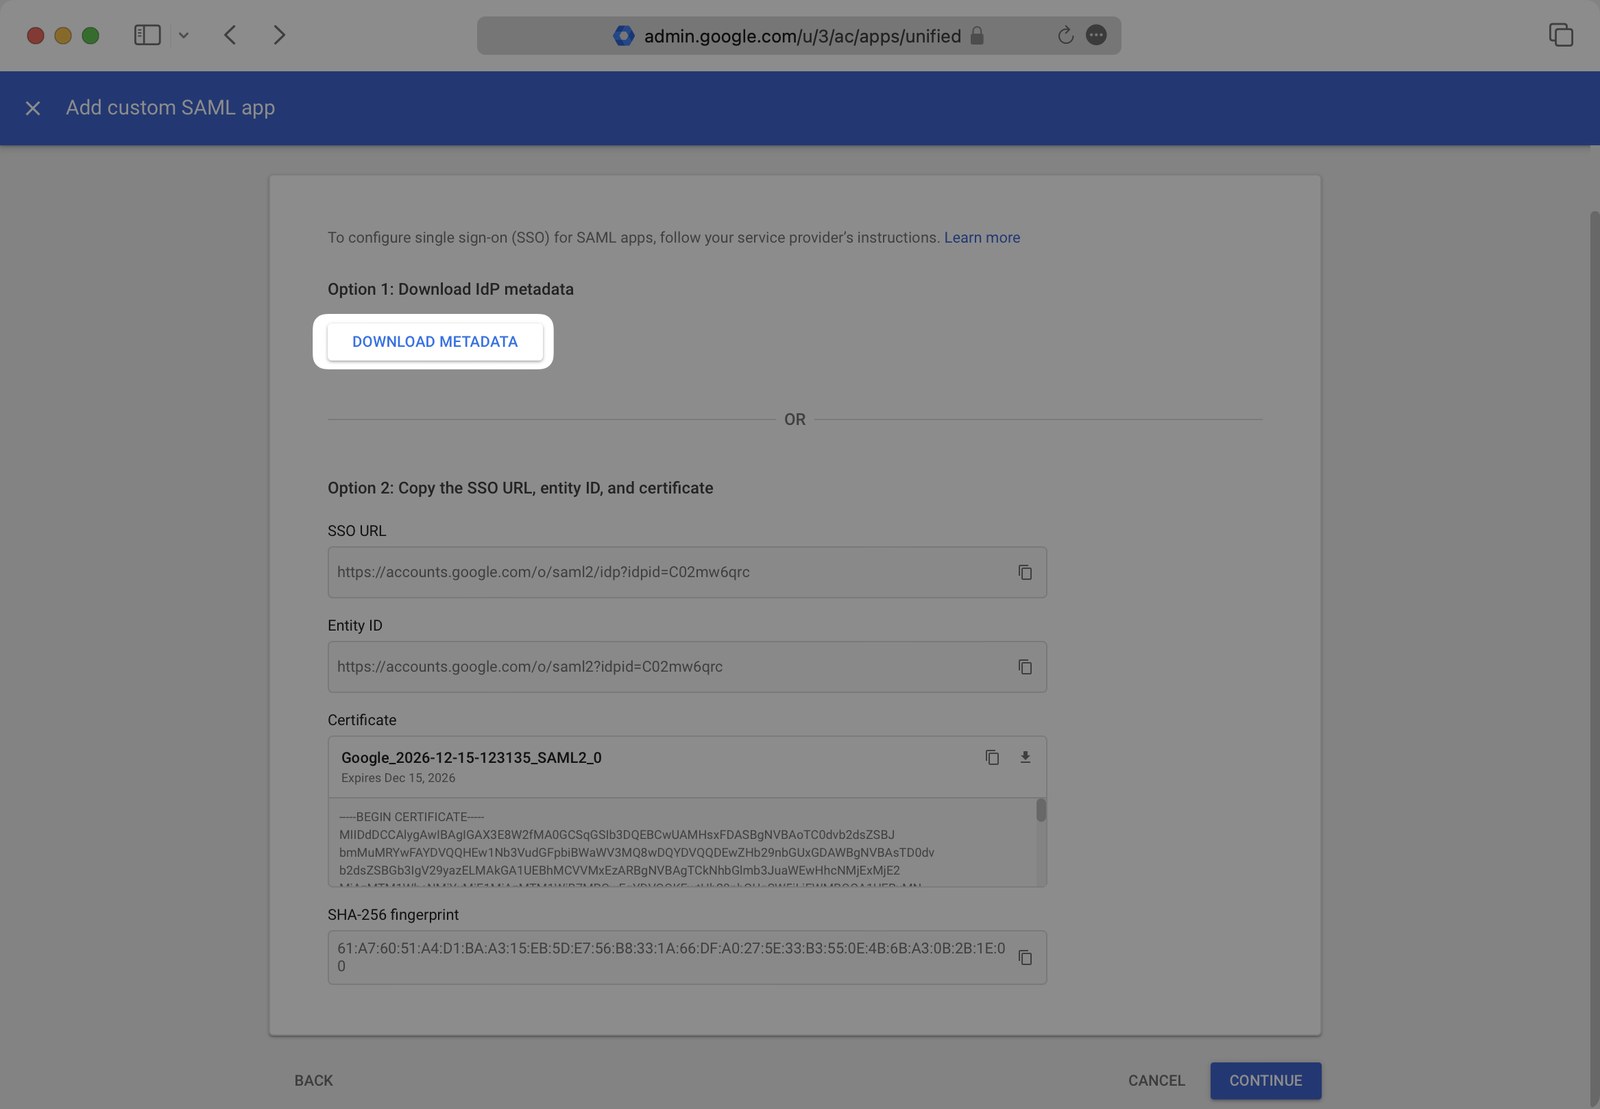
In the Google Admin console, Apps, Web and mobile apps, Add app, Add custom SAML app. Download the metadata file on the Google Identity Provider details step (Google provides a file, not a URL). On Service provider details, paste the ACS URL and the SP Entity ID, set Name ID format to UNSPECIFIED and Name ID to Basic Information, Primary email. Map Primary email to email, First name to firstName, Last name to lastName. Turn the app ON for the right organizational units; Google can take up to 24 hours to apply that. Upload the metadata file in the portal.
Any other SAML provider (Custom SAML)
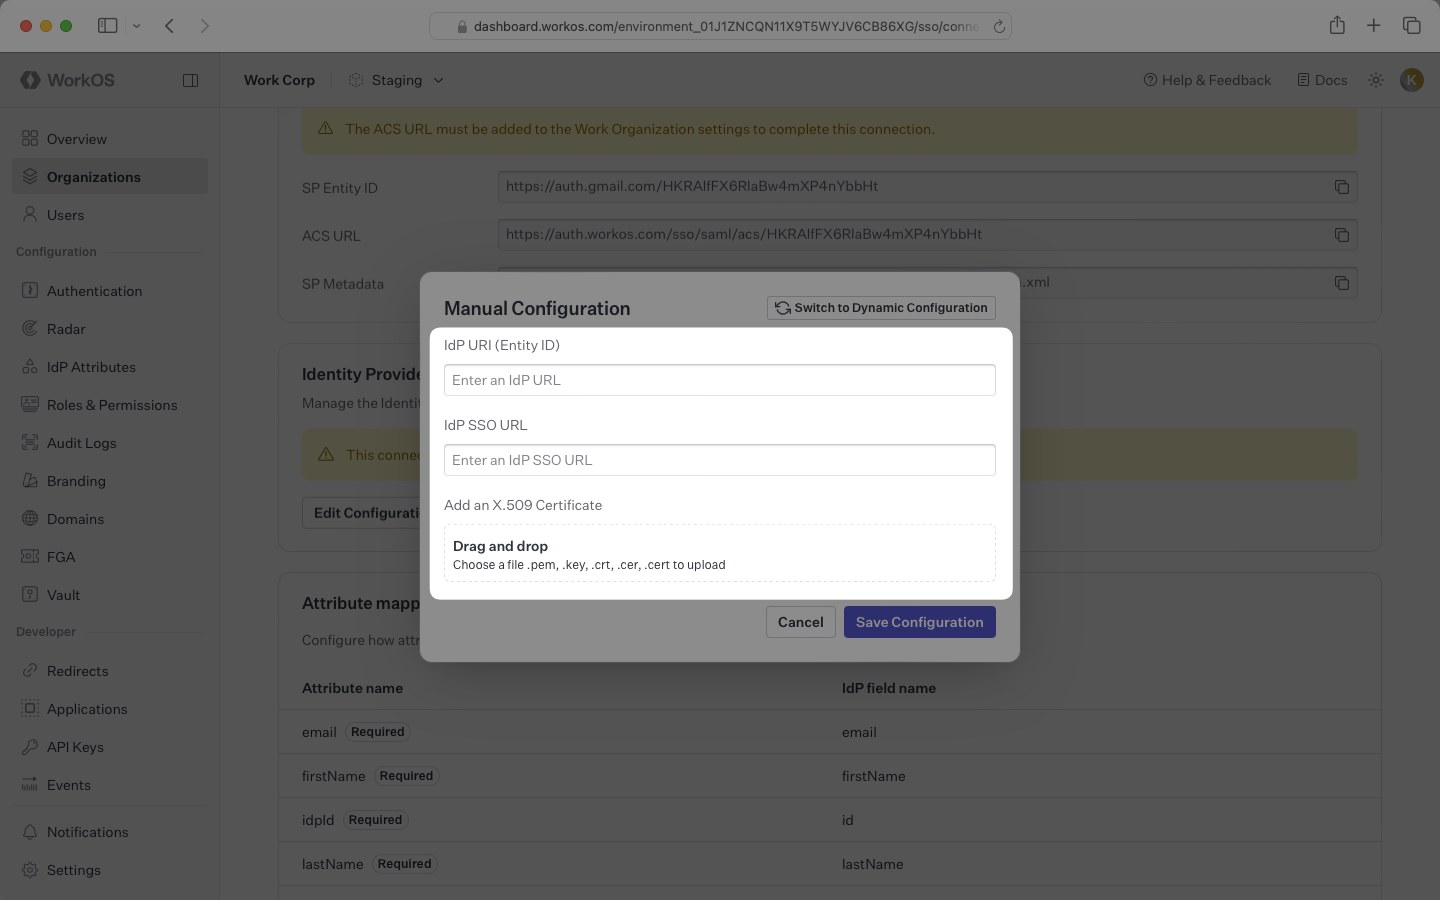
WorkOS supplies the ACS URL, SP Entity ID, and SP Metadata URL. It needs back either your Identity Provider Metadata URL (preferred) or, under Manual configuration, the IdP URI (Entity ID), IdP SSO URL, and the X.509 certificate. Required attribute statements: id, email, firstName, lastName.
Any OpenID Connect provider (Custom OpenID Connect)
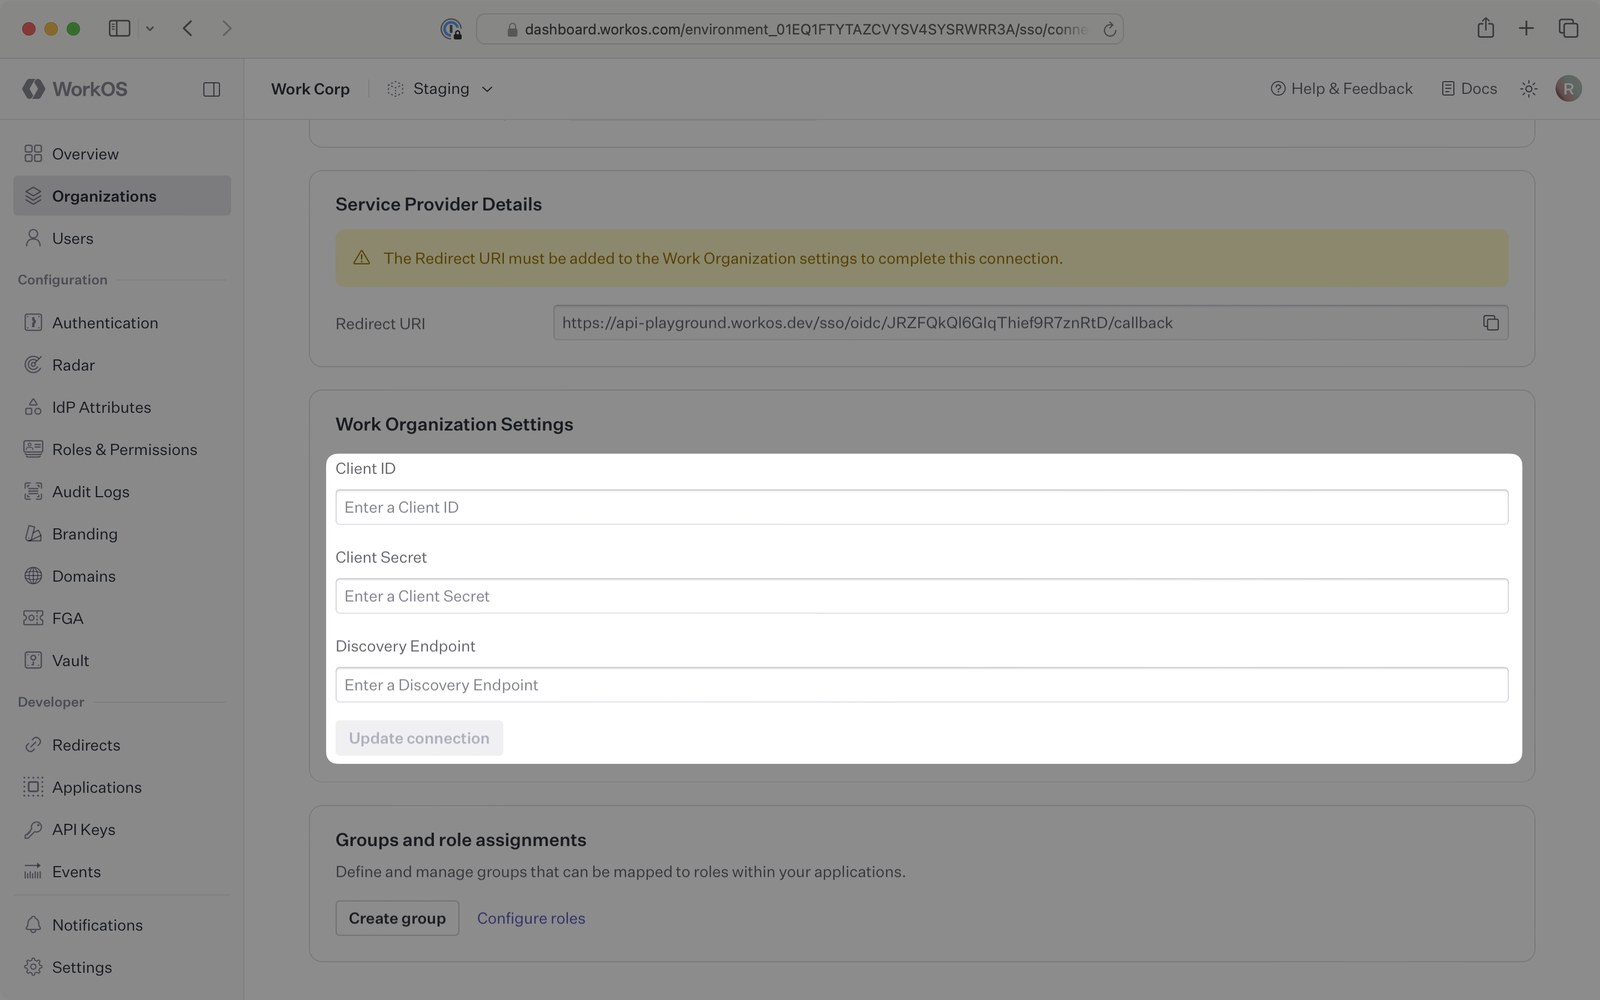
WorkOS supplies a Redirect URI. It needs back the Client ID, Client Secret, and Discovery Endpoint (ending in /.well-known/openid-configuration). The ID token must carry sub and email; given_name and family_name are expected by default. Client secrets expire on the schedule you set when you create them, so put the renewal date in your calendar. Where you have the choice, SAML with a metadata URL has no such recurring task.
13
What do I need to allowlist?
| Item | Value | Effect if blocked |
|---|---|---|
| Application | Your workspace address (in your email) and beta.everyonesocial.app | Users cannot reach the application. |
| SSO sign-in | api.workos.com and auth.workos.com, plus your identity provider's sign-in host | SSO sign-in does not complete. |
| Setup portal (IT admin only) | setup.workos.com | The identity-provider admin cannot open the wizard. |
| Sign-in emails | no-reply@beta.everyonesocial.app | One-time sign-in links never arrive. |
| Invitations and notifications | notifications@beta.everyonesocial.app | Admin and member invitations, approvals, and mentions are quarantined. |
| Digests and campaigns | digest@send.everyonesocial.app | Scheduled program emails are quarantined. |
| Connecting LinkedIn | www.linkedin.com and static.licdn.com | Members cannot connect their LinkedIn account. |
If your workspace is moving to a new application address, add the new address ahead of the move; your EveryoneSocial contact confirms it, and any change to the sending addresses, in writing.
14
Troubleshooting
| You see | What it means | What to do |
|---|---|---|
| Not enabled for this workspace yet on the Single sign-on card | EveryoneSocial has not switched SSO on for your workspace. | Ask your EveryoneSocial contact. Nothing on your side can change it. |
| The setup link says it has expired | Links live five minutes and are single use. | Return to Access and click Configure SSO again. |
| The connection reads Validating | Nobody has completed a sign-in through it yet. | Run Test sign-in in the portal, or use the test sign-in link. |
| A test sign-in fails with an error about the profile being outside the organization | The email address returned by your identity provider is not on a verified workspace domain. | Check the email claim maps to the work address, and that the domain is verified. |
| A sign-in fails with a claims or attribute error | A required claim is missing or empty. | Re-check the four claims in 4d, and that the user has a mail value. |
| A user is told they are not assigned | They are not assigned to the application in your identity provider. | Assign them, or their group. |
| Require SSO for workspace members is disabled | No connected identity provider, or no verified domain. | Hover the switch; the tooltip names which one. Finish Step 5 or Step 6. |
| The domain stays Pending | The TXT record has not been found yet. | Check the record name and value against the portal, allow for propagation, then press Check verification. |
| Your identity provider is down and admins are locked out | The requirement is on and every non-SSO door is closed for your domain. | Contact EveryoneSocial. We turn the requirement off for your workspace, sessions that came through SSO are untouched, and we turn it back on together once your provider recovers. |
15
What should a security reviewer know?
- Identity brokering runs on WorkOS, which acts as the SAML or OIDC service provider. WorkOS stores the user profile returned by your identity provider (name, email, and IP address of the sign-in) and publishes SOC 2 Type II, SOC 3, and SIG Lite attestations. Ask your EveryoneSocial contact for the current subprocessor list.
- EveryoneSocial has no passwords. Members sign in with a one-time email link, with Google, or through your identity provider; when SSO is required, only the last remains for people on your verified domains.
- Every change on the Access page is written to your workspace audit log: opening the setup portal, adding or removing a domain, and turning the SSO requirement on or off, with who did it and when.
- Authorization stays in EveryoneSocial. Your identity provider decides who may authenticate; workspace admins decide who is an admin.
16
Questions?
Reply to the email this guide came with. Your workspace address, your domain, and your test sign-in link are in that email.